05 Nov 2017
|
Python
Python 3.x 기반의 코드입니다.
BeautifulSoup 라이브러리 설치
pip를 이용해서 설치합니다. 콘솔창에서 다음 명령어를 입력합니다.
> pip install beautifulsoup4
예제 코드
기본적인 사용법
from bs4 import BeautifulSoup

html = """


        Hello, BeautifulSoup
        This is a example.
        BeautifulSoup helps to scrap web page easily.

</heml>
"""

soup = BeautifulSoup(html, "html.parser")

h1 = soup.html.body.h1
p1 = soup.html.body.p
p2 = p1.next_sibling.next_sibling

print("h1 = " + h1.string)
print("p1 = " + p1.string)
print("p1 = " + p2.string)
</pre>


## id 요소를 활용한 파싱


from bs4 import BeautifulSoup

html = """


        Hello, BeautifulSoup
        This is a example.
        BeautifulSoup helps to scrap web page easily.

</heml>
"""

soup = BeautifulSoup(html, "html.parser")

h1 = soup.find(id="title")
p1 = soup.find(id="first")

print("h1 = " + h1.string)
print("p1 = " + p1.string)
</pre>


또한 아래의 코드를 이용하여 파싱이 잘 되었는지 확인할 수 있습니다.


soup = BeautifulSoup(html, "html.parser")
print(soup.prettify())


## 기상청 페이지 정보 파싱하기


import urllib.request as req
from bs4 import BeautifulSoup

REST_API = "http://www.kma.go.kr/weather/forecast/mid-term-rss3.jsp"
values = {
    'stnId': '108'
}
url = REST_API + "?" + "stnId=108"
res = req.urlopen(url)

soup = BeautifulSoup(res, "html.parser")

title = soup.find("title")
wf = soup.find("wf")

print("title = " + title.string)
print("wf = " + wf.string)
05 Nov 2017
|
Python
Python 3.x 기반의 코드입니다. 기상청 페이지의 HTML 데이터를 가져오는 예제입니다.
중간에 stnId라는 변수가 나오는데, 지역 코드입니다.
| 지역 |
지역 코드 |
| 전국 |
108 |
| 서울, 경기도 |
109 |
| 강원도 |
105 |
| 충청북도 |
131 |
| 충청남도 |
133 |
| 경상북도 |
143 |
| 전라북도 |
146 |
| 전라남도 |
156 |
| 경상남도 |
159 |
| 제주도 |
184 |
예제 코드
import urllib.request
import urllib.parse

REST_API = "http://www.kma.go.kr/weather/forecast/mid-term-rss3.jsp"

values = {
    'stnId': '108'
}
params = urllib.parse.urlencode(values)

url = REST_API + "?" + params

data = urllib.request.urlopen(url).read()

text = data.decode("UTF-8")
print(text)
04 Nov 2017
|
Python
Python 3.x 기반의 코드입니다. 웹페이지의 HTML 본문을 가져오는 코드입니다.
예제 코드
import urllib.request

url = "http://snowdeer.github.io/"

res = urllib.request.urlopen(url)
data = res.read()

text = data.decode("UTF-8")
print(text)
03 Nov 2017
|
Python
Python 3.x 기반의 코드입니다. 인터넷 등 네트워크 상에 있는 파일을 다운로드하는 샘플 코드입니다.
예제 코드
urlretrieve() 함수를 이용하여 바로 파일에 저장
import urllib.request

url = "http://snowdeer.github.io/public/img/hello_page.jpg"
filename = "snowdeer.jpg"

urllib.request.urlretrieve(url, filename)
print("Saving image is successful.")
urlopen() 함수를 이용하여 메모리에 저장한 다음 파일에 저장
import urllib.request

url = "http://snowdeer.github.io/public/img/hello_page.jpg"
filename = "snowdeer.jpg"

image = urllib.request.urlopen(url).read()

with open(filename, mode="wb") as f:
    f.write(image)
    print("Saving image is successful.")
02 Nov 2017
|
머신러닝
강화 학습(Reinforcement Learning)은 일련의 행동 후에 보상이나 평가가 주어질 때 사용할 수 있는 학습 방법입니다.
여기서는 강화 학습 중 Q-Learning 방법에 대해서 C++ 예제를 살펴보도록 하겠습니다.
Q Value는 어떤 상태에서 취해야 할 각각의 행동들에 대한 지표가 되는 수치입니다.
무작위 행동을 하면서 특정 보상에 도달한 행동에 대해서는 적절한 보상을 해주고 보상에 따라 Q Value를 업데이트 해주면서 결국 정답에 가까운 행동을 할 수 있도록 자연스럽게 유도하는 학습 방법입니다.
여기서는 Q-Learning 방법을 이용하여 미로 찾기를 하는 강화 학습 코드를 살펴보도록 하겠습니다.
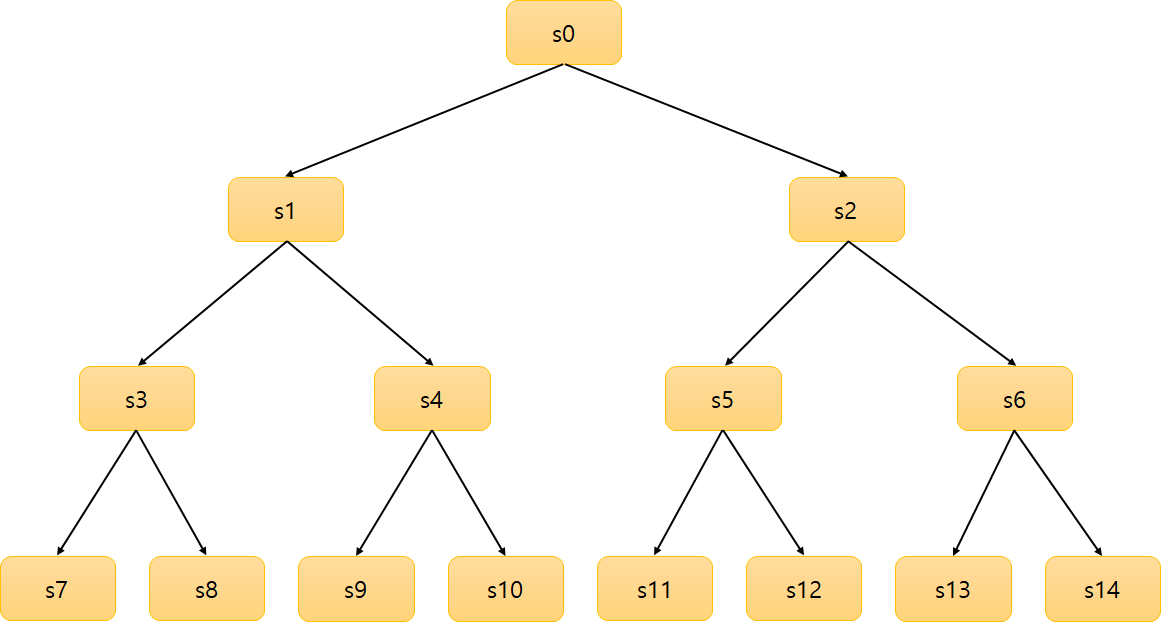
위 그림과 같은 미로가 있으며, 가장 마지막 노드인 s14에 도착하면 보상을 주도록 했습니다.
C++ 예제 코드
#include <stdio.h>
#include <stdlib.h>
#include <time.h>

static const int NODE_COUNT = 15;
static const double EPSILON = 0.3f;
static const int LEARNING_COUNT = 1000;   // 학습 횟수
static const double GAMMA = 0.9f;         // 할인율
static const double ALPHA = 0.1;          // 학습 계수

int getRandom(int max) {
  return rand() % (max + 1);
}

double getRandom() {
  return (double)rand() / RAND_MAX;
}

void printQTable(int qtable[NODE_COUNT]) {
  for (int i = 1; i < NODE_COUNT; i++) {
    printf("%d\t", qtable[i]);
  }
  printf("\n");
}

void initQTable(int qtable[NODE_COUNT]) {
  for (int i = 0; i < NODE_COUNT; i++) {
    qtable[i] = getRandom(100);
  }
  printQTable(qtable);
}

int getNextNode(int pos, int qtable[NODE_COUNT]) {
  int left = 2 * pos + 1;
  int right = 2 * (pos + 1);

  int nextNode;
  if (getRandom() < EPSILON) {
    if (getRandom(1) == 0) {
      nextNode = left;
    }
    else {
      nextNode = right;
    }
  }
  else {
    if (qtable[left] > qtable[right]) {
      nextNode = left;
    }
    else {
      nextNode = right;
    }
  }

  return nextNode;
}

int updateQTable(int pos, int qtable[NODE_COUNT]) {
  int left = 2 * pos + 1;
  int right = 2 * (pos + 1);

  int qvalue = 0;
  int qmax;

  if (pos > 6) {
    if (pos == 14) {
      qvalue = qtable[pos] + ALPHA * (1000 - qtable[pos]);
    }
    else {
      qvalue = qtable[pos];
    }
  }
  else {
    if (qtable[left] > qtable[right]) {
      qmax = qtable[left];
    }
    else {
      qmax = qtable[right];

    }
    qvalue = qtable[pos] + ALPHA * (GAMMA * qmax - qtable[pos]);
  }

  return qvalue;
}

int main() {
  srand(time(NULL));

  int nodeId;
  int qtable[NODE_COUNT];

  initQTable(qtable);

  for (int i = 0; i < LEARNING_COUNT; i++) {
    nodeId = 0;
    for (int j = 0; j < 3; j++) {
      nodeId = getNextNode(nodeId, qtable);

      qtable[nodeId] = updateQTable(nodeId, qtable);
    }

    printQTable(qtable);
  }
  return 0;
}