블록체인에서 PoW와 PoS
02 Jul 2017 | BlockChain블록체인을 조금 공부해보면 바로 만날 수 있는 용어들입니다. 작업증명(PoW, Proof of Work)은 무엇이며, 지분증명(PoS, Proof of Stake)은 무엇일까요?
블록체인의 경제 모델
PoW, PoS 이런 용어들이 뭔지 알기전에 먼저 블록체인의 경제 모델을 이해해야 합니다. 여기서 말하는 경제 모델은 ‘왜 노드(Node)들이 자발적으로 블록체인에 뛰어들어 자신의 리소스를 사용해가며 합의 과정을 진행하는가?’ 입니다.
블록체인의 경제 모델은 ‘P2P의 경제 모델’과 일치합니다. 대부분의 노드들은 자신은 큰 수고를 하지 않고 이득만을 취하려고 하는게 기본입니다.
비트토렌트의 경제모델
대표적인 P2P 서비스인 비트토렌트(BitTorrent)의 경제 모델을 생각해봅시다. 비트토렌트는 다양한 파일들을 서버에서 제공해주는 것이 아닌, 피어(Peer)들간의 자발적인 공유를 이용해서 서로 주고받을 수 있게 하고 있습니다.
하지만, 대부분의 사람들은 자신의 파일을 업로드하는 것보다 원하는 파일을 다운로드하는 것에만 관심이 있습니다. 그러면 파일을 업로드하고 공유해주는 사람들은 과연 왜 그런 행동을 하는 것일까요? 그것도 자신의 트래픽을 소모해가면서까지…
그래서 비트토렌토에서는 자신이 업로드 대역을 제공하지 않는 프리라이더(Free Rider)에게는 대역폭을 제한하는 방법을 이용합니다. 즉, 자신이 뭔가를 원하면 자신도 뭔가를 내놓아야하는 강제성을 두고 있습니다.
비트코인의 경제모델
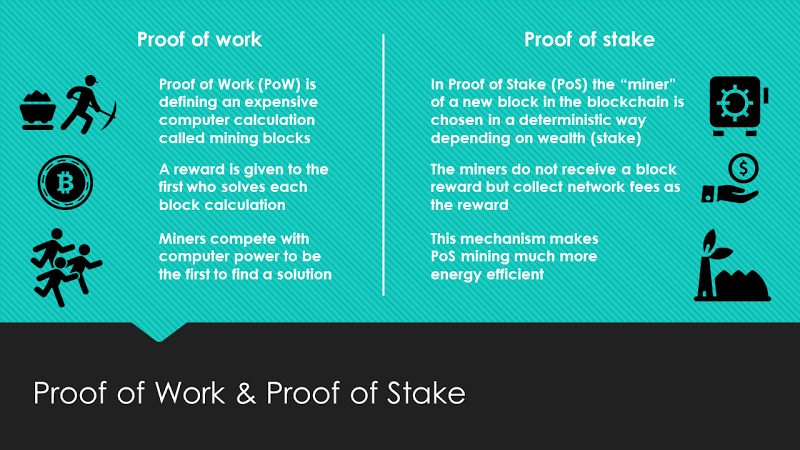
비트코인 및 다른 블록체인기반 가상화폐들은 각각의 경제모델을 갖고 있습니다. 비트코인의 경우 다음 블록을 생성하기 위한 해시(Hash)값을 찾는 작업을 수행해야 하며, 그것은 많은 컴퓨팅 파워를 필요로 합니다. 그래서 많은 노드들이 자발적으로 블록을 생성하는 작업에 참여할 수 있도록, 블록을 생성한 노드에게 보상을 주는 인센티브(Incentive) 모델을 채택하고 있습니다. 이러한 방법들이 대표적으로 PoW, PoS 같은 모델입니다.
작업증명(PoW, Proof of Work)
PoW는 어떠한 작업을 위해 리소스(ex. 컴퓨팅 파워 등)를 투입했다는 것을 증명하여 부정을 억제하는 방법을 말합니다. 즉, 참여를 위해서는 무조건 리소스를 투입해야 하기 때문에 스팸이나 DoS 공격(Denial of Service Attack, 서비스 방해 공격) 등을 하는 것도 부담이 될 수 밖에 없도록 하는 것입니다. PoW의 대표적인 예로 스팸메일을 방지하기 위해 메일의 헤더에 SHA-1 해시값의 처음 20비트가 0이 되는 랜덤값 스탬프를 탑재하는 방법이 있습니다. 메일 1통을 보내기 위해서 약 1초간의 작업이 필요하도록 하는 것입니다. 일반적으로 메일을 보낼 때는 1초는 아무런 문제가 되지 않을 수 있지만, 수백만 건을 한 번에 전송하는 스팸 메일을 보내는 것에는 큰 타격을 줄 수 있는 방법입니다.
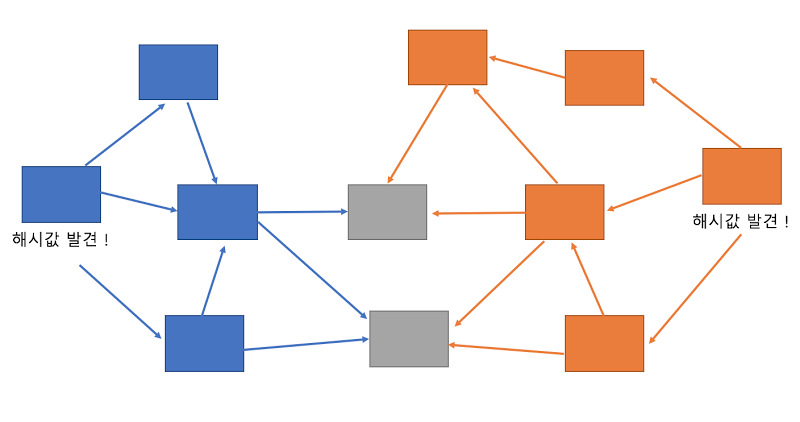
비트코인은 PoW 방식을 채택하고 있습니다. 블록을 생성하기 위해서는 고유의 해시값이 필요한데 이 해시값은 특정 알고리즘이나 공식으로 발견할 수 있는 것이 아니라 무작위로 대입을 해서 찾아내야 하는 값입니다. 그리고 이 값의 검증에는 비용이 거의 들지 않도록 하여 해당 작업에 참여한 누구라도 검증은 쉽게 할 수 있도록 했습니다. 그래서 작업에 참여한 노드들 중에서 다음 블록의 해시값을 발견한 노드만 블록을 생성할 수 있도록 하였습니다.
만약 다음 블록 생성에 필요한 비용이 ‘0’에 가깝다면 누구든지 블록을 쉽게 만들 수 있고, 계속 블록을 이어나갈 수 있습니다. 비트코인의 특성상 블록을 생성한 사람이 동시에 나타나면 체인이 분기되어 여러 개가 만들어질 수 있고 그 중 가장 길이가 긴 체인을 선택하도록 되어 있습니다. 즉, 악의적인 노드들이 다수 참여하여 부정한 블록들을 계속해서 만들어가면 비트코인이 붕괴되는 현상까지 발생할 수도 있습니다. 그래서 이를 방지하기 위해서 비트코인에서는 다음 블록 생성에 필요한 비용을 무작위 해시값을 찾는 작업에 투입하도록 했고, 이 시간은 약 10분간 전체 노드의 컴퓨터를 열심히 돌려야 획득할 수 있도록 정했습니다. 즉, 악의적인 노드들이 비트코인 네트워크를 붕괴시키려고 해도 전체 리소스의 일정 수 이상, 51% 이상의 리소스를 투입하지 않고는 공격을 제대로 할 수 없도록 하고 있습니다.
PoW의 문제점
하지만, PoW에는 문제점들이 있습니다. 블록을 생성하기 위해서 아무 의미도 없는 해시값을 찾아내야 하고, 그 작업을 위해 불필요한 리소스들이 대거 투입되어 무의미한 에너지 소비가 증가하는 문제가 있습니다. 실제로 비트코인 마이닝(Mining) 작업을 해보면 전기세가 엄청나게 나오며, 전 세계적으로 보면 이러한 전기 소모는 엄청나다고 볼 수 있습니다.
또한 특정 연산 능력만이 강요되다보니, 연산 능력이 집약된 별도 칩들이 등장하게 되고 화폐 경제에서 ‘가진 자’와 ‘못 가진 자’로 나눠지는 문제가 발생하게 됩니다. 그리고 블록 생성의 보상을 다 같이 나눠갖기 위한 연맹인 마이닝 풀(Mining Pool)이 만들어가지고 이러한 세력 나눔은 더더욱 강화되어버렸습니다.
이러한 문제점들 때문에 다른 가상 화폐들에서는 새로운 형태의 PoW 알고리즘을 찾아내려고 노력을 하기도 하며, PoS 같은 보유 지분에 비례하여 증명이 가능한 방법을 채택하려고 노력하기도 합니다.
지분 증명(PoS, Proof of Stake)
PoS는 블록을 생성할 수 있는 확률을 각 노드가 갖고 있는 토큰의 지분에 비례하도록 하는 증명 방식입니다. 사실 PoS는 토큰의 지분을 투입하는 리소스라고 보면, PoW의 구체적인 하나의 종류라고 볼 수 있습니다. 실제로 PoS의 알고리즘 공식은 ‘다이제스트를 사용한 PoW’로 표현됩니다.
PoS는 기존의 PoW 방식이 갖고 있는 문제점들을 어느 정도 해결합니다.
- 에너지 소비는 무시할 수 있을 정도로 낮습니다.
- 리소스 집약이 어렵습니다.
하지만, PoS도 단점들은 갖고 있습니다.
PoS의 단점
PoS는 지분이 많을 수록 더 유리해지는 방식이므로, 각 노드들이 토큰을 수집하기만 하고 사용하지 않으려는 경향이 나타날 수 있습니다. 그래서 사용하지 않는 오래된 토큰에 대해서는 지분 평가를 떨어뜨리는 ‘Proof of Stake Velocity’라는 방식이 제안되고 있습니다.
또한 필요한 리소스 투입 코스트가 너무 저렴하여 ‘아무 것도 수행하지 않는 문제(Nothing at Stake)’가 발생할 수 있습니다. 이 문제는, 어떠한 이유 때문에 체인이 분기된 경우 사태를 수습해야 하는데, 체인이 분기되면 각 노드들은 양쪽 체인 모두에서 같은 양의 지분을 갖고 있게 됩니다. 즉, 양쪽에서 연산을 진행할 수 있기 때문에 굳이 사태를 수습할 이유가 없습니다. 또한 거꾸로 양쪽 체인 모두에게 베팅이 가능하기 때문에 체인 분기를 고의로 노리고 계속 시도할 수 있다는 단점도 있습니다.
그리고 블록체인의 첫 번째 블록에 해당하는 제네시스 블록 시점에서 지분이 100%에 달하기 때문에 시스템을 개시한 사람은 몇 번이고 전체 블록을 다시 만들어낼 수 있다는 치명적인 문제가 있습니다. 그 외의 각 노드들도 지분만 갖고 있으면 그 시점부터 다시 시작하는 것이 가능하기 때문에 PoS만으로는 위변조를 막을 수 없는 단점이 있습니다. 블록을 생성하는 코스트가 너무 낮기 때문에 이전 블록들로 거슬러 올라가서 현재까지의 모든 체인을 위변조할 수 있는 가능성이 존재합니다.
하이브리드 모델
PoW와 PoS가 각각의 특징, 장단점이 있기 때문에 최근에는 하이브리드 방식으로 시도하는 곳도 생겨났습니다. 하지만, PoW와 PoS를 한 네트워크에서 동시에 수행하는 것에는 어려움이 많고 안정성 문제도 많이 발생해서, 동시에 수행한다기 보다는 초반에 PoW로 많은 화폐들을 채굴해놓고, 어느 정도 시점이 흐른 후에 PoS로 전환하는 하이브리드 방식을 많이 고려하고 있습니다.