Introduction to widgets - (1)
04 Jun 2020 | FlutterFluttter 공식 홈페이지의 가이드 문서 내용입니다. 실제 문서 주소는 여기입니다.
Flutter Widgets
Flutter Widget들은 React에서 아이디어를 가져왔습니다. 상당히 많은 부분이 흡사합니다. 코드를 이용해서 UI를 구성하는 것 부터
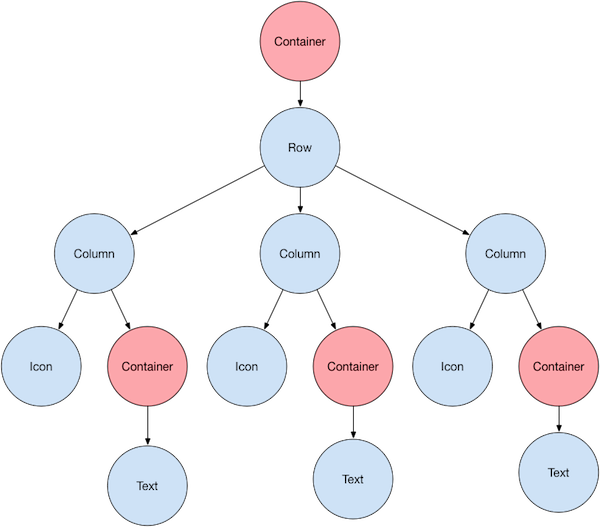
State라는 개념을 이용해서 State가 변경되면 각 Widget들이 알아서 화면을 갱신하는 라이프 사이클까지 많은 부분이 비슷합니다. 각 컴포넌트는 트리 형태로
구성되어 있고, 각 컴포넌트의 화면을 새로 렌더링해야 할 지를 판단해서 자동으로 갱신을 해줍니다.
Hello World
Flutter에서의 ‘Hello World’ 코드는 다음과 같습니다.
import 'package:flutter/material.dart';

void main() {
  runApp(
    Center(
      child: Text(
        'Hello, world!',
        textDirection: TextDirection.ltr,
      ),
    ),
  );
}
runApp() 함수는 Widget을 입력받아서 해당 위젯 트리의 root에 배치해줍니다. 위의 예제 코드에서는 Center 위젯이 root에 배치됩니다.
Center 위젯은 Text라는 위젯을 자식(child)으로 갖고 있으며, 결국 화면에 ‘Hello, world!’라는 문구를 출력하게 되어 있습니다.
App을 개발하면서 일반적으로 위젯 성격에 따라 StatelessWidget 또는 StatefulWidget을 사용하게 될 것입니다. 위젯에서 제일 중요한 부분은 화면을 렌더링하는 것이며,
렌더링은 build() 함수를 구현하면서 이루어집니다.
기본 위젯들
-
Text: 텍스트를 출력해주는 위젯입니다. -
Row,Column: 주의할 점이Row는 Horizontal,Column은 Vertical 방향입니다.Row는 가로로 1줄을 차지하고 그 안에서children들끼리 공간을 나눠가진다고 생각하면 편합니다.Column은 그 반대입니다. -
Stack:Stack은 위젯들끼리 서로 겹치게 배치할 수 있는 컨테이너의 일종입니다.Positionsed위젯을 이용해서 안드로이드의RelativeLayout처럼 상대적인 위치에 자식 위젯들을 배치할 수 있습니다. -
Container:child를 하나 가지는 기본적인 컨테이너입니다.BoxDecoration을 이용해서 배경(background)이나 외곽선(border), 그림자(shadow) 등을 꾸며줄 수 있고margin이나padding등의 속성을 줄 수 있습니다.
기본 위젯 예제 코드
import 'package:flutter/material.dart';

class MyAppBar extends StatelessWidget {
  MyAppBar({this.title});

  // Fields in a Widget subclass are always marked "final".

  final Widget title;

  @override
  Widget build(BuildContext context) {
    return Container(
      height: 56.0, // in logical pixels
      padding: const EdgeInsets.symmetric(horizontal: 8.0),
      decoration: BoxDecoration(color: Colors.blue[500]),
      // Row is a horizontal, linear layout.
      child: Row(
        // <Widget> is the type of items in the list.
        children: <Widget>[
          IconButton(
            icon: Icon(Icons.menu),
            tooltip: 'Navigation menu',
            onPressed: null, // null disables the button
          ),
          // Expanded expands its child to fill the available space.
          Expanded(
            child: title,
          ),
          IconButton(
            icon: Icon(Icons.search),
            tooltip: 'Search',
            onPressed: null,
          ),
        ],
      ),
    );
  }
}

class MyScaffold extends StatelessWidget {
  @override
  Widget build(BuildContext context) {
    // Material is a conceptual piece of paper on which the UI appears.
    return Material(
      // Column is a vertical, linear layout.
      child: Column(
        children: <Widget>[
          MyAppBar(
            title: Text(
              'Example title',
              style: Theme.of(context).primaryTextTheme.headline6,
            ),
          ),
          Expanded(
            child: Center(
              child: Text('Hello, world!'),
            ),
          ),
        ],
      ),
    );
  }
}

void main() {
  runApp(MaterialApp(
    title: 'My app', // used by the OS task switcher
    home: MyScaffold(),
  ));
}
위의 예제 코드에서 main() 함수를 보면 MaterialApp으로 프로그램을 실행하게 되어 있습니다. pubspec.yaml 내에 uses-material-design: true 옵션이 설정되어 있어야 가능한데, 대부분 기본적으로 이미 세팅되어 았기 때문에 크게 신경 쓸 필요가 없습니다.
flutter:
  uses-material-design: true
home 속성을 보면 MyScaffold() 위젯을 배치하도록 되어 있습니다. MyScaffold 위젯은 StatelessWidget로 build() 메소드 내부를 보면, Column 위젯을 갖고 있습니다. Column 안에는 MyAppBar 위젯과 Expanded 위젯이 Vertical 방향으로 배치되어 있습니다.
Material Components를 활용한 간략화
위 예제 코드는 길이가 제법 긴데, Flutter는 다수의 Material Widget 들을 갖고 있기 때문에, 각 위젯들을 일일이 구현할 필요가 없습니다.
위 예제 코드의 MyAppBar 위젯과 MyScaffold 위젯은 material.dart 내에 정의되어 있는 AppBar와 Scaffold 위젯으로 대체가 됩니다.
(만약 iOS 스타일의 테마로 개발하시고 싶으면 Cupertino 컴포넌트 패키지를 활용해야 합니다.)
import 'package:flutter/material.dart';

void main() {
  runApp(MaterialApp(
    title: 'Flutter Tutorial',
    home: TutorialHome(),
  ));
}

class TutorialHome extends StatelessWidget {
  @override
  Widget build(BuildContext context) {
    // Scaffold is a layout for the major Material Components.
    return Scaffold(
      appBar: AppBar(
        leading: IconButton(
          icon: Icon(Icons.menu),
          tooltip: 'Navigation menu',
          onPressed: null,
        ),
        title: Text('Example title'),
        actions: <Widget>[
          IconButton(
            icon: Icon(Icons.search),
            tooltip: 'Search',
            onPressed: null,
          ),
        ],
      ),
      // body is the majority of the screen.
      body: Center(
        child: Text('Hello, world!'),
      ),
      floatingActionButton: FloatingActionButton(
        tooltip: 'Add', // used by assistive technologies
        child: Icon(Icons.add),
        onPressed: null,
      ),
    );
  }
}