19 Mar 2017
|
MAC OS
안드로이드 SDK의 Path 설정
Mac에서 터미널을 통해 ‘adb’ 명령어를 실행하고 싶을 때가 종종 있습니다. Windows에서는 Android SDK가 설치된 경로를 환경변수로 등록해놓으면 되는데, Mac에서도 방법은 비슷합니다. 다만, Mac에서 Android SDK가 설치되어 있는 폴더 위치를 몰라서 Path 등록을 못하는 경우가 종종 있습니다.
Mac에서 Android SDK가 설치되는 폴더
사용자가 임의로 폴더 위치를 수정하지 않았다면, 기본적으로 Android SDK는 다음 위치에 설치됩니다.
/Users/snowdeer/Library/Android
.bash_profile 수정
환경 변수를 등록하기 위해서 .bash_profile을 수정하면 됩니다. 터미널에서 nano를 이용해서 수정을 해도 되고, 편하게 GUI 상의 ‘텍스트편집기’를 이용해서 수정을 해도 됩니다. 기본적으로 .bash_profile은 속성이 ‘숨김(Hidden)’으로 되어있습니다. Finder에서 숨김 파일을 보기 위해서는 Finder 창 안에서 단축키 Shift + Command + . 을 누르면 됩니다. .bash_profile은 /User/[사용자계정] 아래에 위치하고 있습니다.
그리고 .bash_profile 내에 다음과 같은 라인을 추가합니다.
export ANDROID_PATH=/Users/snowdeer/Library/Android
export PATH=$PATH:$ANDROID_PATH/sdk/platform-tools
이제 터미널을 다시 시작한 후 터미널 콘솔 창에서 adb 명령어를 입력해보면 잘 실행되는 것을 확인할 수 있습니다.
18 Mar 2017
|
Android
Android Studio
문제 해결
Android Studio에서 Google Service를 사용하는 어플을 개발하다가 패키지 이름(Package Name)을
변경해야 할 경우가 생겼습니다. 그래서 리팩토링(Refactoring) 기능을 활용해서 패키지 이름을 바꾸었습니다.
혹시나 리팩토링 과정에서 생략되었을지도 모르는 manifest.xml 안의 내용과 build.gradle 안의
내용도 찾아서 수정하였습니다.
그런 다음, 빌드(Build)를 수행했는데, 다음과 같은 오류가 발생했습니다.
Error:Execution failed for task ':app:processDebugGoogleServices'.
>; No matching client found for package name 'com.example.exampleapp'
해결법
해결법은 다음과 같았습니다.
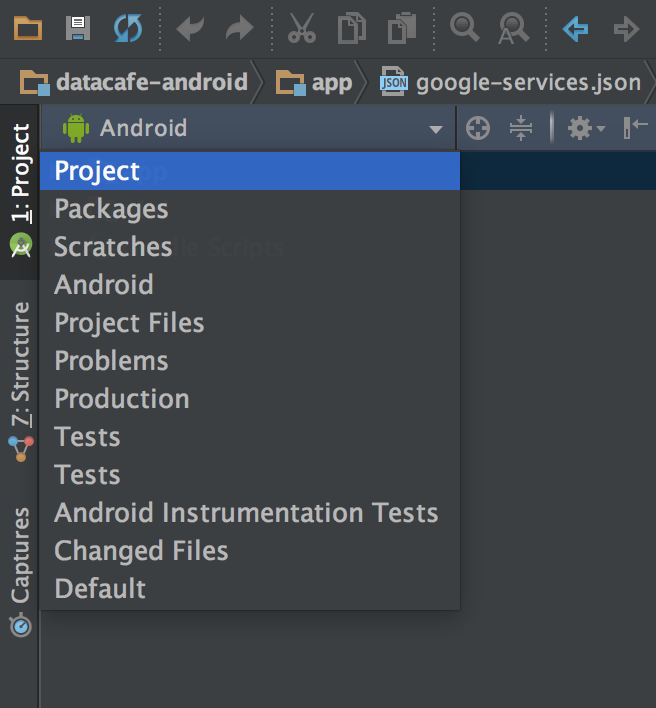
먼저 Android Studio의 네비게이션 Bar의 보기 방식을 Project로 바꿔줍니다.
(기본은 Android로 되어 있습니다.)
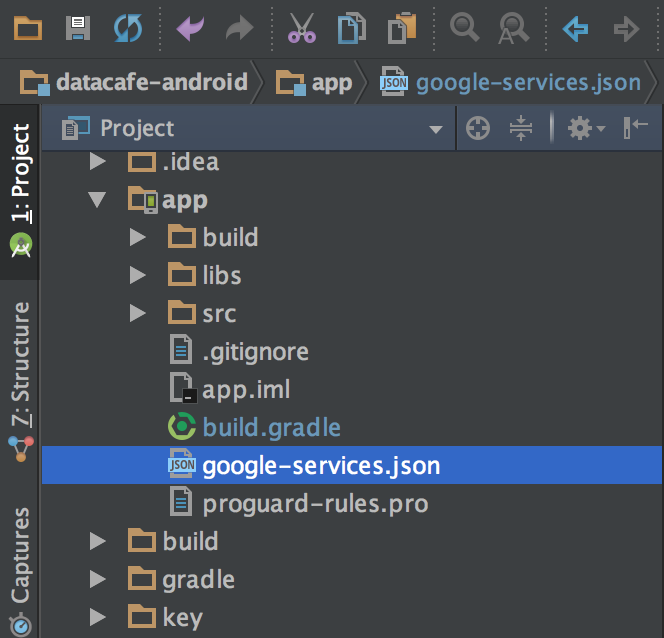
 그러면 ‘app’ 폴더 아래 다음 이미지와 같이 ‘google-service.json’ 파일이 보일 것입니다.
 이 파일의 내부에서
"client": [
  {
    "client_info": {
      "mobilesdk_app_id": "1:169851363875:android:33b601ddd12370e2",
      "android_client_info": {
        "package_name": "com.snowdeer.myexample"
      }
    },
    ...
  }
]
패키지 이름을 변경한 패키지 이름과 동일하게 맞추어 주면 됩니다. 이 파일 안에 패키지 이름이
등장하는 부분이 몇 군데 있는데, 전부 수정해주면 됩니다.
17 Mar 2017
|
Android
Android Studio
문제 해결
안드로이드 어플리케이션을 개발할 때 메소드 개수가 65536개 이상이 되어 빌드가 되지 않는
현상이 있습니다. 빌드시 발생하는 오류 메세지는 다음과 같습니다.
오류메세지
Execution failed for task ':app:transformClassesWithDexForDebug'.
>; com.android.build.api.transform.TransformException:
com.android.ide.common.process.ProcessException:
java.util.concurrent.ExecutionException:
com.android.dex.DexIndexOverflowException:
method ID not in [0, 0xffff]: 65536
DexIndex가 오버플로(Overflow)되었으며, 메소드 ID(method ID)를 인덱스내에서 발견하지 못했다는 메세지입니다.
해결법
이 경우는 몇 가지 해결책이 있습니다. 보통, 메소드 개수가 65536개를 넘는 경우가 흔하지는 않습니다.
이를 넘긴 경우는 주로 외부 오픈 소스들을 남발한 경우가 대부분일 것입니다.
즉, 이런 경우는 다음과 같은 방법으로 해결할 수 있습니다.
- 참조하는 외부 라이브러리 개수를 줄이고, 필요한 건 직접 구현해서 사용하는 방법
- Proguard 등을 이용하여 사용하지 않는 메소드를 삭제하는 방법
- Multidex 기능을 이용하는 방법
가장 좋은 건 리팩토링을 통해 구조 개선을 하고, 꼭 필요한 라이브러리만 참조하는 방법입니다.
하지만, 이 방법은 시간과 노력이 많이 드는 방법이라 일단 Multidex 기능을 이용하는 방법을
알아보도록 하겠습니다.
참고로, 이 문제에 대한 구글의 공식 설명이
존재합니다.
Multidex 활용한 해결 방법
build.gradle 수정
defaultConfig에 다음과 같이 ‘multiDexEnabled true’ 항목을 추가합니다.
defaultConfig {
    ...
    multiDexEnabled true
    ...
}
그리고 dependencies에도 다음 항목을 추가해줍니다.
dependencies {
    ...
    compile 'com.android.support:multidex:1.0.0'
    ...
}
Application 상속
그리고 메인 Application을 다음과 같이 ‘android.support.multidex.MultiDexApplication’을 상속받도록 수정합니다.
import android.support.multidex.MultiDexApplication;

public class MyApplication extends MultiDexApplication {
  ...
}
만약 Application을 Java 클래스로 구현해서 사용하고 있지 않다면, manifest.xml에서 application을 다음과 같이 수정하면 됩니다.
Manifest.xml
<application
  android:name="android.support.multidex.MultiDexApplication"
  ...>
14 Mar 2017
|
용어
요즘 화두가 되고 있는 단어 ‘4차 산업혁명’에 대해서 알아보도록 하겠습니다.
4차 산업혁명(4IR, 4th Industrial Revolution)
간단히 말하면 정보통신기술의 융합으로 가져올 기술 혁신을 말합니다. 대표적인 것들로 인공지능, 로봇공학, IoT(Internet of Things), 무인 시스템, 3D 프린터 등을 들 수 있습니다.
‘4차 산업혁명’이라는 단어는 2016년 1월 20일, 스위스에서 열린 ‘세계 경제 포럼’에서 처음 언급되었습니다. 세계 경제 포럼에서는 4차 산업혁명을 ‘3차 산업혁명을 기반으로 한 디지털과 바이오산업, 물리학 등의 경계를 융합하는 기술혁명’이라고 설명했습니다.
산업혁명의 역사
그러면 산업혁명의 역사에 대해서 잠깐 살펴보도록 하겠습니다.
1차 산업혁명
증기기관의 등장으로 가져온 산업혁명입니다. 가장 유명한 산업혁명입니다. 유럽과 미국에서 18세기에서 19세기에 걸쳐서 일어났습니다.
2차 산업혁명
전기로 공장에서 대량생산이 가능하게 된 산업혁명입니다. 전기, 철강, 석유 등의 산업이 크게 확장되었습니다. 제 1차 세계대전 직전인 1870년에서 1914년 사이에 일어났습니다.
3차 산업혁명
아날로그 장비에서 디지털 장비로 넘어가게 된 산업혁명입니다. 컴퓨터를 이용한 생산 자동화가 이루어지고, 컴퓨터의 보급화, 인터넷이 대중적으로 퍼지게 됩니다.
4차 산업혁명
4차 산업혁명은 대규모의 빅데이터 분석, 인공지능, 그리고 각 사물들의 연결 및 다양한 분야의 융합으로 이루어지리라 예상하고 있습니다.
제조 산업의 패러다임 변화
4차 산업혁명은 제조 산업 전반의 패러다임을 바꾸고 있습니다. 기존의 제조 산업이 공장에서 각 라인을 따라 부품들이 자동으로 조립되어져 나오는 것이었다면, 4차 산업에서는 각 라인을 담당하는 기계들이 서로 연결되어 있고 끊임없이 상태를 체크하고 정보를 교환합니다. 재고량과 생산량을 자동으로 체크하고 조절할 수 있으며, 부품의 상태에 따라 자동으로 부품을 바꾸거나 조립 순서를 바꿉니다. 기계 스스로 학습하고 다양한 제품들을 신속하게 만들어냅니다.
기존에는 생산 시스템을 조금 수정하려면 상당히 긴 시간이 필요했지만, 4차 산업혁명 이후는 이러한 변경이 짧은 시간에 이루어질 수 있고, 다양한 제품들을 쉽게 만들어내어 소비자들의 다양한 욕구를 더욱 쉽게 충족시킬 수 있게 됩니다.
10 Mar 2017
|
용어
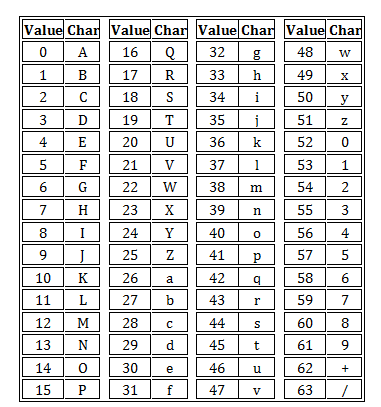
Base64
Base64는 64진법이라는 뜻입니다. 화면에 표현하는 문자 종류가 64가지라는 뜻으로 이해하면 됩니다. 전자 메일이나 바이너리 데이터를 전송할 때 많이 사용됩니다. Base64의 정확한 규격은 RFC 1421, RFC 2045에 정의되어 있습니다.
사용하는 문자
Base64에서 사용하는 문자는 A-Z, a-z, 0-9의 총 62가지에 기호 2개로 이루어져 있습니다. 기호 2개는 보통 ‘+’와 ‘/’으로 구성되는데, Base64 변종들에 따라서 조금씩 다르기도 합니다. 그리고 끝을 알리는 코드로 ‘=’를 사용합니다.
한계점
Base64의 한계점은 보통 대문자, 소문자, 숫자의 62개 문자외에 추가로 사용하는 기호 2개에서 옵니다. 해당 문자는 파일 이름이나 URL 주소 등으로 사용할 수 없는 특수 문자입니다. 그러다보니 기호 2개를 뺀 62개의 문자로 표현하는 Base62나 눈으로 보면 헷갈리는 문자들(예를 들어 O와 o, 숫자 0 등)을 제외한 Base58 등을 사용하기도 합니다.