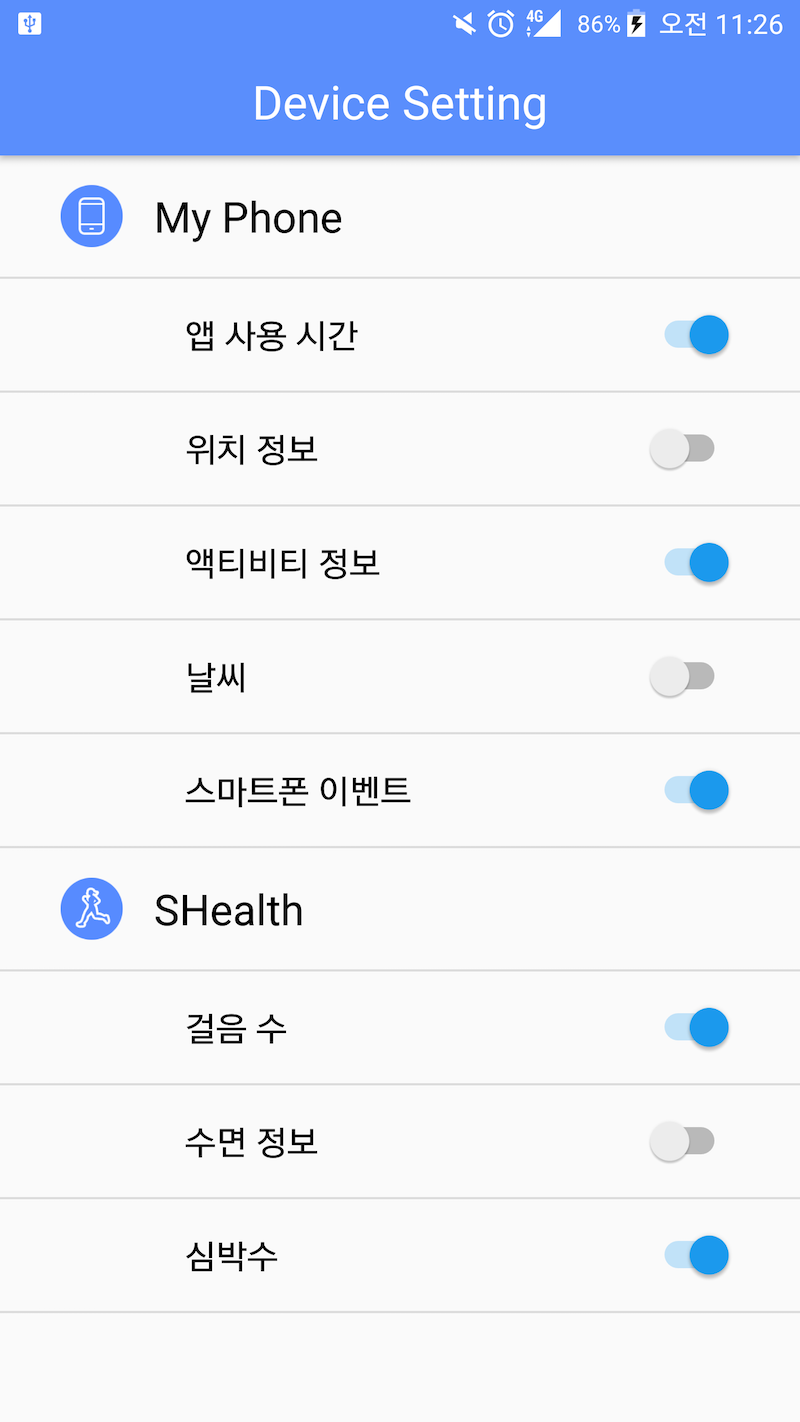
Google API Key 등록하기

|

Google Awareness API를 이용한 간단한 프로그램을 개발할 일이 생겼습니다. 하지만, Awareness API를 쓰기 위해서는 Google로부터 Google API Key를 등록 및 승인받아야만 사용이 가능했습니다. 그래서 여기서는 Google API Key를 등록하는 방법을 포스팅해보록 하겠습니다.


Developer Console 접속

일단 구글 개발자 콘솔에 접속한다.

image -fullwidth

여기에서 왼쪽 편의 메뉴에서 라이브러리를 선택합니다.

image -fullwidth

그리고 원하는 API를 선택합니다. 저는 Awareness API를 사용할 것이기 때문에 Awareness API를 선택했습니다. API 종류가 많기 때문에 검색을 이용하면 좀 더 편리하게 API를 찾을 수 있습니다.

image -fullwidth

화면 가운데 위쪽에 있는 사용 설정 글씨를 클릭해줍니다. 버튼 형태가 아니라서 찾기가 어려웠네요.

image -fullwidth

화면 오른편 위쪽에 사용자 인증 정보 만들기 버튼을 클릭합니다.

image -fullwidth

어떤 사용자 정보가 필요한가요 버튼을 눌러줍니다.

image -fullwidth

드디어 API 키가 생성되었다. 여기에서 키 제한하기를 눌러서 키 사용의 제한을 걸어두도록 합니다.

image -fullwidth

저는 Android 용으로 사용하기 위해서 Android 앱을 선택했습니다.

Android 앱을 선택하면 Android App의 패키지 이름과 Signed Key의 SHA1 값을 요구합니다. Signed Key의 SHA1은 화면에 있는 명령어를 커맨드 라인에서 입력하여 얻을 수 있습니다. mystore.keystore 대신 자신의 key 이름을 입력하면 됩니다.

signingConfigs{
keytool -list -v -keystore mystore.keystore

그러면 다음과 같은 출력 결과가 나오고, 이 중에서 SHA1 값만 있으면 됩니다.

image -fullwidth

App의 패키지 이름과 Signed Key의 SHA1 값을 획득하면, 위의 화면에서 패키지 이름 및 지문 추가 버튼을 눌러서 각 값을 입력해주면 됩니다.

Android Studio Gradle 에서 빌드시 Signed Key 설정하기

|

Android Studio에서 빌드할 때 Signed Key를 설정하는 방법을 포스팅하도록 하겠습니다.

물론, 본문의 내용과 곤계 없이 Android Studio에서 빌드를 할 때, Release로 메뉴에서 Generate Signed APK를 선택하여 빌드하는 방법도 있습니다. 하지만, 매번 빌드할 때마다 일일이 메뉴로 들어가서 해당 기능으로 APK를 생성하는 건 여간 번거로운 일입니다. 게다가 Release 모드가 아닌 평소 개발용인 Debug 모드로 빌드할 때도 Signed Key를 설정해야 하는 경우도 발생할 수 있기 때문에 여기서는 gradle 설정을 통해 Signed Key를 설정하는 방법을 포스팅해보겠습니다.


build.gradle 설정

app의 build.gradle 파일을 엽니다. 그리고 아래와 같이

signingConfigs{
        releaseWithSignedKey {
            storeFile file("SampleKeyStore.jks")
            storePassword "password1"
            keyAlias "sample"
            keyPassword "password2"
        }
    }

항목을 만들어 줍니다. 그리고, buildType에 아래와 같이

buildTypes {
        release {
            minifyEnabled false
            proguardFiles getDefaultProguardFile('proguard-android.txt'), 'proguard-rules.pro'
            signingConfig signingConfigs.releaseWithSignedKey
        }
    }

와 같이 설정해주면 됩니다. 그리고 만약 Debug 모드에서도 Signed Key를 참조하게 하려면 다음과 같이 하면 됩니다.

buildTypes {
        release {
            minifyEnabled false
            proguardFiles getDefaultProguardFile('proguard-android.txt'), 'proguard-rules.pro'
            signingConfig signingConfigs.releaseWithSignedKey
        }
        debug{
            signingConfig signingConfigs.releaseWithSignedKey
        }
    }


그런데, 이렇게 하면 build.gradle에 KeyStore의 민감한 정보들이 너무 노출이 되고 관리도 번거로워지기 때문에 각 값들을 변수 처리해주는 것이 깔끔합니다. 이 때는 Project의 gradle.properties에

SIGNED_STORE_FILE=SampleKeyStore.jks
SIGNED_STORE_PASSWORD=password1
SIGNED_KEY_ALIAS=sample
SIGNED_KEY_PASSWORD=password2

와 같이 작성하고, build.gradle에는

signingConfigs{
        releaseWithSignedKey {
            storeFile file(SIGNED_STORE_FILE)
            storePassword SIGNED_STORE_PASSWORD
            keyAlias SIGNED_KEY_ALIAS
            keyPassword SIGNED_KEY_PASSWORD
        }
    }

와 같이 작성을 해줍니다.


여기까지 적용한 후 Run을 해보면, Signed Key가 정상적으로 적용된 것을 알 수 있습니다.


전체 코드

참고로, 전체 build.gradle 파일 내용을 첨부하도록 하겠습니다.

apply plugin: 'com.android.application'

android {
    compileSdkVersion 25
    buildToolsVersion "25.0.0"
    defaultConfig {
        applicationId "com.datacafe.googleawarenessapi"
        minSdkVersion 15
        targetSdkVersion 25
        versionCode 1
        versionName "1.0"
        testInstrumentationRunner "android.support.test.runner.AndroidJUnitRunner"
    }

    signingConfigs{
        releaseWithSignedKey {
            storeFile file(SIGNED_STORE_FILE)
            storePassword SIGNED_STORE_PASSWORD
            keyAlias SIGNED_KEY_ALIAS
            keyPassword SIGNED_KEY_PASSWORD
        }
    }

    buildTypes {
        release {
            minifyEnabled false
            proguardFiles getDefaultProguardFile('proguard-android.txt'), 'proguard-rules.pro'
            signingConfig signingConfigs.releaseWithSignedKey
        }
        debug{
            signingConfig signingConfigs.releaseWithSignedKey
        }
    }
}

dependencies {
    compile fileTree(dir: 'libs', include: ['*.jar'])
    androidTestCompile('com.android.support.test.espresso:espresso-core:2.2.2', {
        exclude group: 'com.android.support', module: 'support-annotations'
    })
    compile 'com.android.support:appcompat-v7:25.0.1'


    compile 'com.google.android.gms:play-services:10.0.1'

    testCompile 'junit:junit:4.12'
}

CardView 스타일 Drawable

|

안드로이드 L(롤리팝) 부터 CardView라는 UX 컴포넌트가 추가되었습니다. 하지만 여기서는 그 이전 버전에서도 사용할 수 있도록 CardView와 유사한 형태의 Drawable를 만들어보고자 합니다.

먼저 drawable 폴더에 각 xml 파일들을 작성합니다.


layer_card_background.xml

<?xml version="1.0" encoding="utf-8"?>
<layer-list xmlns:android="http://schemas.android.com/apk/res/android">
  <item>
    <shape android:shape="rectangle">
      <solid android:color="#CABBBBBB" />
      <corners android:radius="2dp" />
    </shape>
  </item>

  <item
    android:bottom="2dp"
    android:left="0dp"
    android:right="0dp"
    android:top="0dp">
    <shape android:shape="rectangle">
      <solid android:color="@android:color/white" />
      <corners android:radius="2dp" />
    </shape>
  </item>
</layer-list>


layer_card_background_selected.xml

<?xml version="1.0" encoding="utf-8"?>
<layer-list xmlns:android="http://schemas.android.com/apk/res/android">
  <item>
    <shape android:shape="rectangle">
      <solid android:color="#CABBBBBB" />
      <corners android:radius="2dp" />
    </shape>
  </item>

  <item
    android:bottom="2dp"
    android:left="0dp"
    android:right="0dp"
    android:top="0dp">
    <shape android:shape="rectangle">
      <solid android:color="#CCCCCC" />
      <corners android:radius="2dp" />
    </shape>
  </item>
</layer-list>


selector_card_background.xml

<?xml version="1.0" encoding="utf-8"?>

<selector xmlns:android="http://schemas.android.com/apk/res/android">
  <item
    android:drawable="@drawable/layer_card_background_selected"
    android:state_pressed="true" />

  <item android:drawable="@drawable/layer_card_background" />
</selector>


ListView

<ListView
  android:cacheColorHint="@android:color/transparent"
  android:divider="@null"
  android:dividerHeight="10dp"
  android:footerDividersEnabled="true"
  android:headerDividersEnabled="true"
  android:id="@+id/listview"
  android:layout_above="@id/layout_bottom_buttons"
  android:layout_height="match_parent"
  android:layout_width="match_parent"
  android:listSelector="@android:color/transparent" />


각 Item들을 출력하는 View

<FrameLayout xmlns:android="http://schemas.android.com/apk/res/android"
  xmlns:tools="http://schemas.android.com/tools"
  android:id="@+id/layout_background"
  android:layout_width="match_parent"
  android:layout_height="match_parent"
  android:paddingLeft="15dp"
  android:paddingRight="15dp"
  android:descendantFocusability="beforeDescendants">

  <LinearLayout
    android:layout_width="match_parent"
    android:layout_height="wrap_content"
    android:paddingTop="15dp"
    android:paddingBottom="15dp"
    android:paddingLeft="15dp"
    android:paddingRight="15dp"
    android:background="@drawable/selector_card_background"
    android:descendantFocusability="afterDescendants"
    android:orientation="horizontal">

    <ImageView
      android:layout_width="64dp"
      android:layout_height="64dp"
      android:layout_gravity="center_vertical"
      android:src="@drawable/footprint" />

    <LinearLayout
      android:layout_width="match_parent"
      android:layout_height="wrap_content"
      android:layout_marginLeft="15dp"
      android:orientation="vertical">

      <TextView
        android:id="@+id/tv_date"
        android:layout_width="match_parent"
        android:layout_height="wrap_content"
        android:text="2016-11-02 13:30:30"
        android:textColor="@color/darkgray"
        android:textSize="14sp" />

      <TextView
        android:id="@+id/tv_data"
        android:layout_width="match_parent"
        android:layout_height="wrap_content"
        android:text="Beacon1 : 35"
        android:textColor="@color/black"
        android:textSize="12sp" />
    </LinearLayout>


  </LinearLayout>

</FrameLayout>

ViewPager 사용 예제

|

안드로이드 ViewPager를 활용하는 간단한 예제 코드입니다.


Layout 코드

<?xml version="1.0" encoding="utf-8"?>
<RelativeLayout xmlns:android="http://schemas.android.com/apk/res/android"
  xmlns:tools="http://schemas.android.com/tools"
  android:layout_width="match_parent"
  android:layout_height="match_parent">

  <android.support.v4.view.ViewPager
    android:id="@+id/viewpager"
    android:layout_width="match_parent"
    android:layout_height="match_parent">

    <android.support.v4.view.PagerTitleStrip
      android:id="@+id/pager_title_strip"
      android:layout_width="match_parent"
      android:layout_height="wrap_content"
      android:paddingBottom="8dp"
      android:paddingTop="8dp"/>

  </android.support.v4.view.ViewPager>

</RelativeLayout>


그리고 Java 코드는 다음과 같습니다. 이번 예제 코드는 Fragment에서 ViewPager를 사용할 경우의 코드인데, Activity에서 사용할 경우에도 큰 차이는 없습니다.

Java 코드

package com.lnc.prototype.ui.main;

import android.os.Bundle;
import android.support.v4.app.Fragment;
import android.support.v4.app.FragmentManager;
import android.support.v4.app.FragmentPagerAdapter;
import android.support.v4.view.ViewPager;
import android.view.LayoutInflater;
import android.view.View;
import android.view.ViewGroup;

import com.lnc.prototype.R;

public class LocationDataFragment extends Fragment {

  private ViewPager mViewPager;
  private ViewPagerAdapter mViewPagerAdapter;

  @Override
  public View onCreateView(LayoutInflater inflater, ViewGroup container,
      Bundle savedInstanceState) {
    View view = inflater.inflate(R.layout.fragment_location_data,
        container, false);

    mViewPager = (ViewPager) view.findViewById(R.id.viewpager);
    mViewPagerAdapter = new ViewPagerAdapter(getFragmentManager());
    mViewPager.setAdapter(mViewPagerAdapter);

    return view;
  }


  private class ViewPagerAdapter extends FragmentStatePagerAdapter {

    public ViewPagerAdapter(FragmentManager fm) {
      super(fm);
    }

    @Override
    public int getCount() {
      return 2;
    }

    @Override
    public Fragment getItem(int position) {
      Fragment fragment = null;
      switch(position) {
        case 0:
          fragment = new BeaconRadarFragment();
          break;

        case 1:
          fragment = new LocationHistoryFragment();
          break;
      }
      return fragment;
    }

    @Override
    public CharSequence getPageTitle(int position) {
      switch(position) {
        case 0:
          return "Beacon Radar";
        case 1:
          return "Location History";
      }

      return super.getPageTitle(position);
    }
  }

  ;
}

SQLite 사용 예제(별도 DB 파일 사용할 경우)

|

이번에는 SQLiteManager와 같은 외부 Tool을 이용해서 미리 만들어 놓은 DB 파일과 연동할 때 사용하는 예제코드를 포스팅 해봅니다.

저는 외부 Tool을 이용하는 것을 선호합니다. GUI 상에서 Database의 수정이나 관리를 쉽게 할 수 있고, 각종 SQL 스크립트도 쉽게 사용할 수 있기 때문입니다. 또한 각 Table에 입력된 데이터들을 눈으로 확인하기도 쉬워서 SQLiteManager를 주로 사용합니다.

안드로이드에서 제공하는 SQLite Helper 클래스를 조금 수정하여, DB 파일과 연동할 수 있도록 해보겠습니다.


SnowFileDBOpenHelper.java

import java.io.File;
import java.io.FileOutputStream;
import java.io.IOException;
import java.io.InputStream;
import java.io.OutputStream;

import android.content.Context;
import android.database.SQLException;
import android.database.sqlite.SQLiteDatabase;
import android.database.sqlite.SQLiteOpenHelper;

public class SnowFileDBOpenHelper extends SQLiteOpenHelper {

  private SQLiteDatabase sqlite;

  private final Context mContext;
  private final String mFolderPath;
  private final static String mDBFileName = "snowdeer_db.sqlite";

  public SnowFileDBOpenHelper(Context context) {
    super(context, mDBFileName, null, 1);

    mContext = context;
    // Eclipse
    mFolderPath = Environment.getExternalStoragePublicDirectory(null)
        + "/Android/data/" + context.getPackageName() + "/";

    // Android Studio
    mFolderPath = mContext.getExternalFilesDir(null) + "/";

  }

  @Override
  public void onCreate(SQLiteDatabase db) {
  }

  @Override
  public void onUpgrade(SQLiteDatabase db, int oldVersion, int newVersion) {
  }

  public void checkDatabase() {
    try {
      checkFolderExist();
      checkFileExist();
    } catch(IOException e) {
      e.printStackTrace();
    }
  }

  private void checkFolderExist() throws IOException {
    File targetFolder = new File(mFolderPath);
    if(targetFolder.exists() == false) {
      targetFolder.mkdirs();
    }
  }

  private void checkFileExist() throws IOException {
    File targetFile = new File(mFolderPath + mDBFileName);
    if(targetFile.exists() == false) {
      copyDatabase();
    }
  }

  private void copyDatabase() throws IOException {
    InputStream inputStream = mContext.getAssets().open(mDBFileName);

    String outFileName = mFolderPath + mDBFileName;
    OutputStream outputStream = new FileOutputStream(outFileName);

    byte[] buffer = new byte[1024];
    int length;

    while( (length = inputStream.read(buffer)) & gt;
    0){
      outputStream.write(buffer, 0, length);
    }

    outputStream.flush();
    outputStream.close();
    inputStream.close();
  }

  public void openDataBase() throws SQLException {
    String myPath = mFolderPath + mDBFileName;
    sqlite = SQLiteDatabase.openDatabase(myPath, null,
        SQLiteDatabase.NO_LOCALIZED_COLLATORS);
  }

  @Override
  public synchronized void close() {
    if(sqlite != null) {
      sqlite.close();
    }

    super.close();
  }

  @Override
  public SQLiteDatabase getReadableDatabase() {
    checkDatabase();
    openDataBase();

    return sqlite;
  }

  @Override
  public SQLiteDatabase getWritableDatabase() {
    checkDatabase();
    openDataBase();

    return sqlite;
  }
}


SnowFileDBQueryManager.java

import java.util.ArrayList;
import android.content.ContentValues;
import android.content.Context;
import android.database.Cursor;
import android.database.sqlite.SQLiteDatabase;

public class SnowFileDBQueryManager {

  private static final String TABLE_SNOW = "TABLE_SNOW";

  private static SnowFileDBQueryManager mInstance
      = new SnowFileDBQueryManager();

  private SnowFileDBQueryManager() {
  }

  public static SnowFileDBQueryManager getInstance() {
    return mInstance;
  }

  public ArrayList getSnowItemList(Context context) {
    ArrayList resultList = new ArrayList();

    SnowFileDBOpenHelper dbHelper = new SnowFileDBOpenHelper(context);
    try {
      String query = "SELECT _id, userInfo, address FROM "
          + TABLE_SNOW;

      SQLiteDatabase db = dbHelper.getReadableDatabase();
      Cursor cursor = db.rawQuery(query, null);

      while(cursor.moveToNext()) {
        SnowItem item = new SnowItem(cursor.getInt(0),
            cursor.getString(1),
            cursor.getString(2));

        resultList.add(item);
      }
    } catch(Exception e) {
      e.printStackTrace();
    }

    dbHelper.close();
    return resultList;
  }

  public void addSnowItem(Context context, SnowItem item) {
    SnowFileDBOpenHelper dbHelper = new SnowFileDBOpenHelper(context);

    try {
      SQLiteDatabase db = dbHelper.getWritableDatabase();
      ContentValues row = new ContentValues();

      int id = 0;
      if(item.id > 0) {
        id = item.id;
      } else {
        id = getMaxSnowItemId(context);
      }

      row.put("_id", id);
      row.put("userInfo", item.userInfo);
      row.put("address", item.address);

      db.insert(TABLE_SNOW, null, row);
    } catch(Exception e) {
      e.printStackTrace();
    }
    dbHelper.close();
  }

  public void updateSnowItem(Context context, SnowItem item) {
    SnowFileDBOpenHelper dbHelper = new SnowFileDBOpenHelper(context);

    try {
      SQLiteDatabase db = dbHelper.getWritableDatabase();
      ContentValues row = new ContentValues();

      int id = 0;
      if(item.id > 0) {
        id = item.id;
      } else {
        id = getMaxSnowItemId(context);
      }

      row.put("_id", id);
      row.put("userInfoId", item.userInfo);
      row.put("address", item.address);

      String strFilter = "_id = " + item.id;
      db.update(TABLE_SNOW, row, strFilter, null);

    } catch(Exception e) {
      e.printStackTrace();
    }
    dbHelper.close();
  }

  public void deleteSnowItem(Context context, SnowItem item) {
    SnowFileDBOpenHelper dbHelper = new SnowFileDBOpenHelper(context);

    try {
      SQLiteDatabase db = dbHelper.getWritableDatabase();
      String strFilter = "_id = " + item.id;

      db.delete(TABLE_SNOW, strFilter, null);
    } catch(Exception e) {
      e.printStackTrace();
    }
    dbHelper.close();
  }

  private int getMaxSnowItemId(Context context) {
    int result = 0;
    SnowFileDBOpenHelper dbHelper = new SnowFileDBOpenHelper(context);
    try {
      SQLiteDatabase db = dbHelper.getReadableDatabase();
      Cursor cursor = db.rawQuery("SELECT MAX(_id) FROM "
          + TABLE_SNOW, null);

      while(cursor.moveToNext()) {
        result = cursor.getInt(0);
      }
    } catch(Exception e) {
      e.printStackTrace();
    }

    dbHelper.close();
    result = result + 1;

    return result;
  }
}