Flutter Canvas 그리기 예제 - (7) Node 사이 Edge(Arrow) 그리기
28 Dec 2021 | FlutterNode 사이 Edge 그리기
사실 일일이 직접 그려도 되지만, 화살표 끝부분 처리가 너무 귀찮아서 오픈 소스를 활용했습니다. 활용한 오픈소스는 arrow_path 2.0.0입니다.
아래 그림과 다양한 모양의 화살표를 만들 수 있습니다. 하지만, 어차피 경로(Path)는 직접 구해야 합니다.
pubspec.yaml
아래와 같이 pubspec.yaml 파일의 dev_dependencies 항목 아래에 arrow_path: ^2.0.0를 추가해줍니다.
그리고 flutter pub get 명령어를 실행해줍니다.
dev_dependencies:
  flutter_test:
    sdk: flutter

  # The "flutter_lints" package below contains a set of recommended lints to
  # encourage good coding practices. The lint set provided by the package is
  # activated in the `analysis_options.yaml` file located at the root of your
  # package. See that file for information about deactivating specific lint
  # rules and activating additional ones.
  flutter_lints: ^1.0.0
  arrow_path: ^2.0.0
node.dart
기존 코드와 거의 같습니다. id를 int 형으로 변경하긴 했는데, String으로 해도 코드에 큰 차이가 없습니다.
class Node {
  int id;
  String name;
  double x;
  double y;

  Node(this.id, this.name, this.x, this.y);
}
edge.dart
class Edge {
  int fromId;
  int toId;

  Edge(this.fromId, this.toId);
}
draggable_painter.dart
import 'dart:math';
import 'package:arrow_path/arrow_path.dart';
import 'package:flutter/material.dart';
import 'edge.dart';
import 'node.dart';
class DraggablePainter extends CustomPainter {
static const gridWidth = 50.0;
static const gridHeight = 50.0;
var _width = 0.0;
var _height = 0.0;
final double offsetX;
final double offsetY;
final List<Node> nodeList;
final List<Edge> edgeList;
final radius = 30.0;
DraggablePainter(this.nodeList, this.edgeList, this.offsetX, this.offsetY);
void _drawBackground(Canvas canvas) {
var paint = Paint()
..style = PaintingStyle.fill
..color = Colors.white70
..isAntiAlias = true;
Rect rect = Rect.fromLTWH(0, 0, _width, _height);
canvas.drawRect(rect, paint);
}
void _drawGrid(Canvas canvas) {
var paint = Paint()
..style = PaintingStyle.stroke
..color = Colors.grey
..isAntiAlias = true;
final gridRect = Rect.fromLTWH(
offsetX % gridWidth - gridWidth,
offsetY % gridHeight - gridHeight,
_width + gridWidth,
_height + gridHeight);
final rows = _height / gridHeight;
final cols = _width / gridWidth;
for (int r = -1; r <= rows; r++) {
final y = r * gridHeight + gridRect.top;
final p1 = Offset(gridRect.left, y);
final p2 = Offset(gridRect.right, y);
canvas.drawLine(p1, p2, paint);
}
for (int c = -1; c <= cols; c++) {
final x = c * gridWidth + gridRect.left;
final p1 = Offset(x, gridRect.top);
final p2 = Offset(x, gridRect.bottom);
canvas.drawLine(p1, p2, paint);
}
}
Offset _getCenterPosOfNode(nodeId) {
for (final node in nodeList) {
if (nodeId == node.id) {
return Offset(node.x, node.y);
}
}
return null;
}
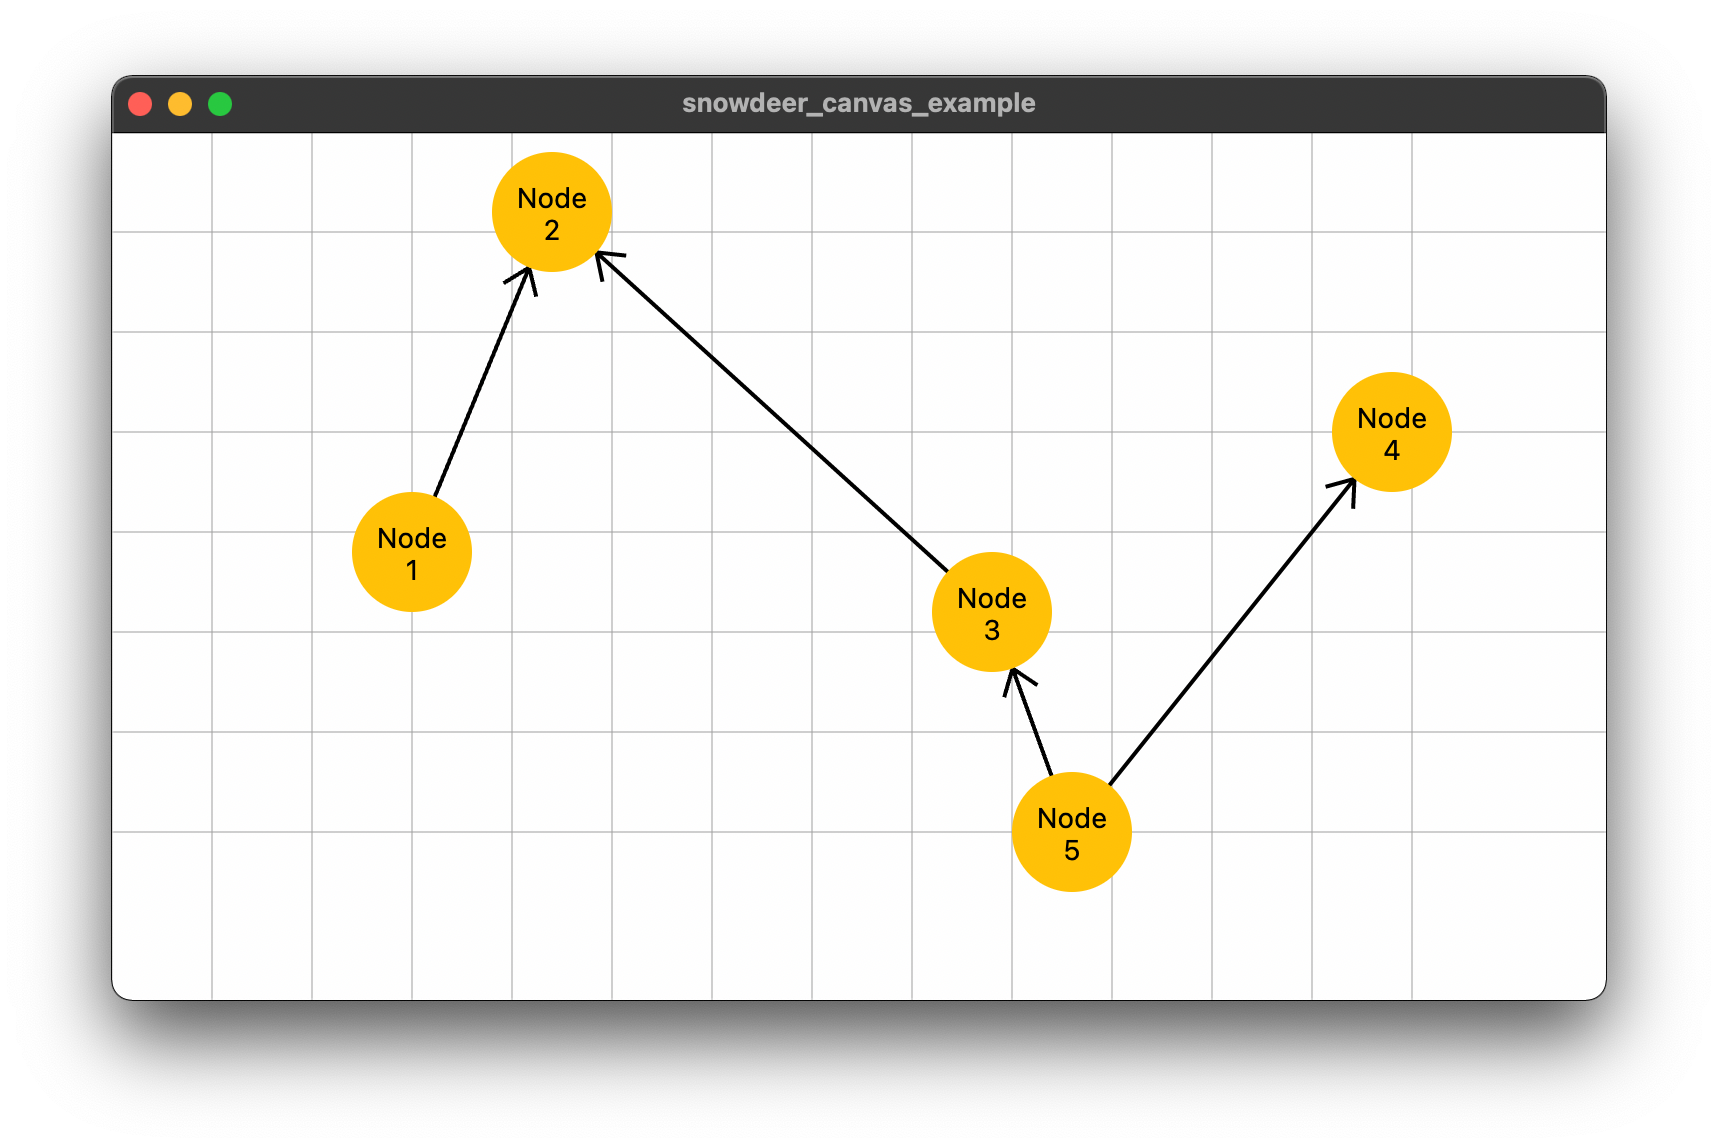
void _drawEdges(Canvas canvas) {
final paint = Paint()
..style = PaintingStyle.stroke
..color = Colors.black
..strokeWidth = 2
..isAntiAlias = true;
for (final edge in edgeList) {
final fromPos = _getCenterPosOfNode(edge.fromId);
final toPos = _getCenterPosOfNode(edge.toId);
if ((fromPos != null) && (toPos != null)) {
final distance =
Offset(toPos.dx - fromPos.dx, toPos.dy - fromPos.dy).distance -
radius;
final theta = atan2((toPos.dy - fromPos.dy), (toPos.dx - fromPos.dx));
final targetX = fromPos.dx + distance * cos(theta);
final targetY = fromPos.dy + distance * sin(theta);
var path = Path();
path.moveTo(fromPos.dx, fromPos.dy);
path.lineTo(targetX, targetY);
path = ArrowPath.make(path: path);
canvas.drawPath(path, paint);
}
}
}
void _drawNodes(Canvas canvas) {
var paint = Paint()
..style = PaintingStyle.fill
..color = Colors.amber
..isAntiAlias = true;
const textStyle = TextStyle(
color: Colors.black,
fontSize: 14,
);
for (int i = 0; i < nodeList.length; i++) {
final c = Offset(nodeList[i].x, nodeList[i].y);
canvas.drawCircle(c, radius, paint);
_drawText(
canvas, nodeList[i].x, nodeList[i].y, nodeList[i].name, textStyle);
}
}
void _drawText(Canvas canvas, centerX, centerY, text, style) {
final textSpan = TextSpan(
text: text,
style: style,
);
final textPainter = TextPainter()
..text = textSpan
..textDirection = TextDirection.ltr
..textAlign = TextAlign.center
..layout();
final xCenter = (centerX - textPainter.width / 2);
final yCenter = (centerY - textPainter.height / 2);
final offset = Offset(xCenter, yCenter);
textPainter.paint(canvas, offset);
}
void _drawCanvas(Canvas canvas) {
_drawBackground(canvas);
_drawGrid(canvas);
canvas.save();
canvas.translate(offsetX, offsetY);
_drawEdges(canvas);
_drawNodes(canvas);
canvas.restore();
}
@override
void paint(Canvas canvas, Size size) {
_width = size.width;
_height = size.height;
_drawCanvas(canvas);
}
@override
bool shouldRepaint(CustomPainter oldDelegate) => true;
}
draggable_canvas.dart
import 'package:flutter/material.dart';
import 'draggable_painter.dart';
import 'edge.dart';
import 'node.dart';
class DraggableObjectPage extends StatefulWidget {
const DraggableObjectPage({Key key}) : super(key: key);
@override
State createState() => DraggableObjectPageState();
}
class DraggableObjectPageState extends State<DraggableObjectPage> {
final List<Node> nodeList = List.empty(growable: true);
final List<Edge> edgeList = List.empty(growable: true);
var offsetX = 0.0;
var offsetY = 0.0;
var preX = 0.0;
var preY = 0.0;
Node currentNode;
DraggableObjectPageState() {
initNodes();
initEdges();
}
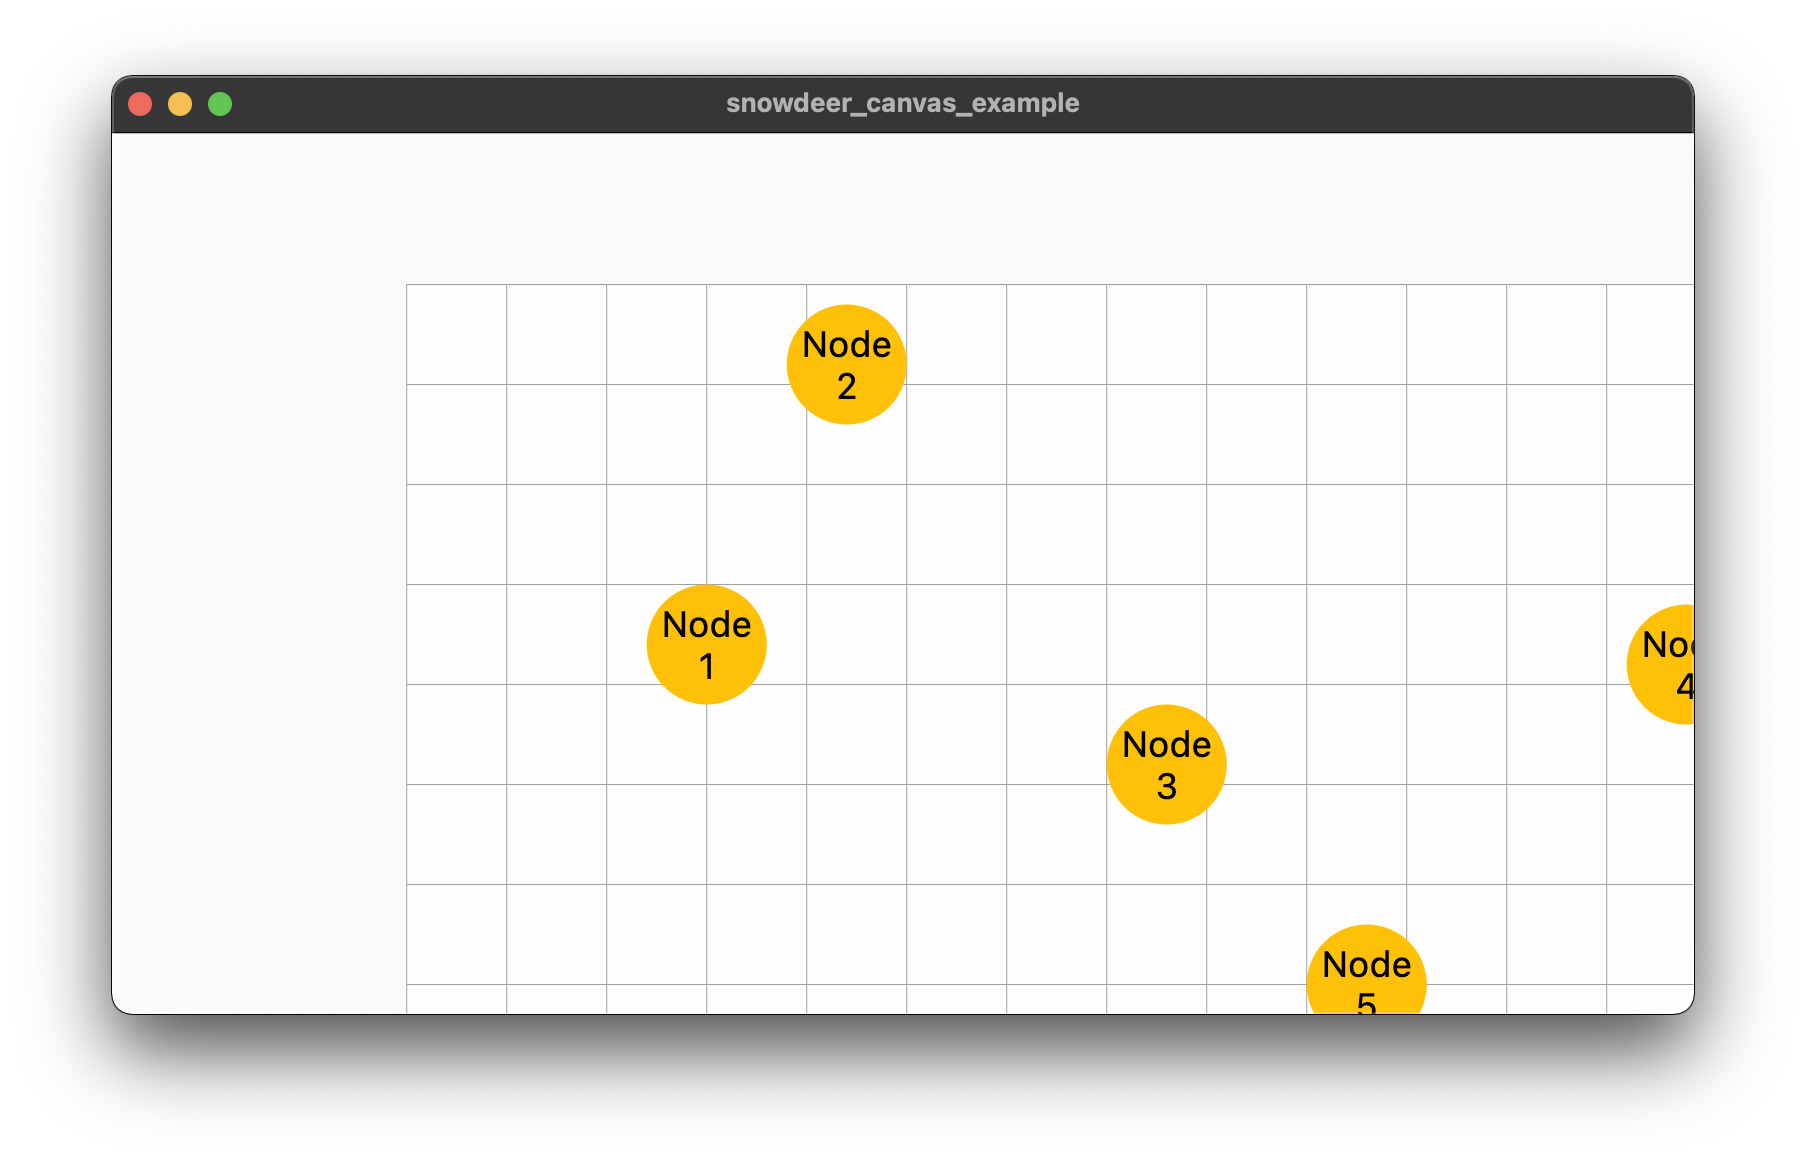
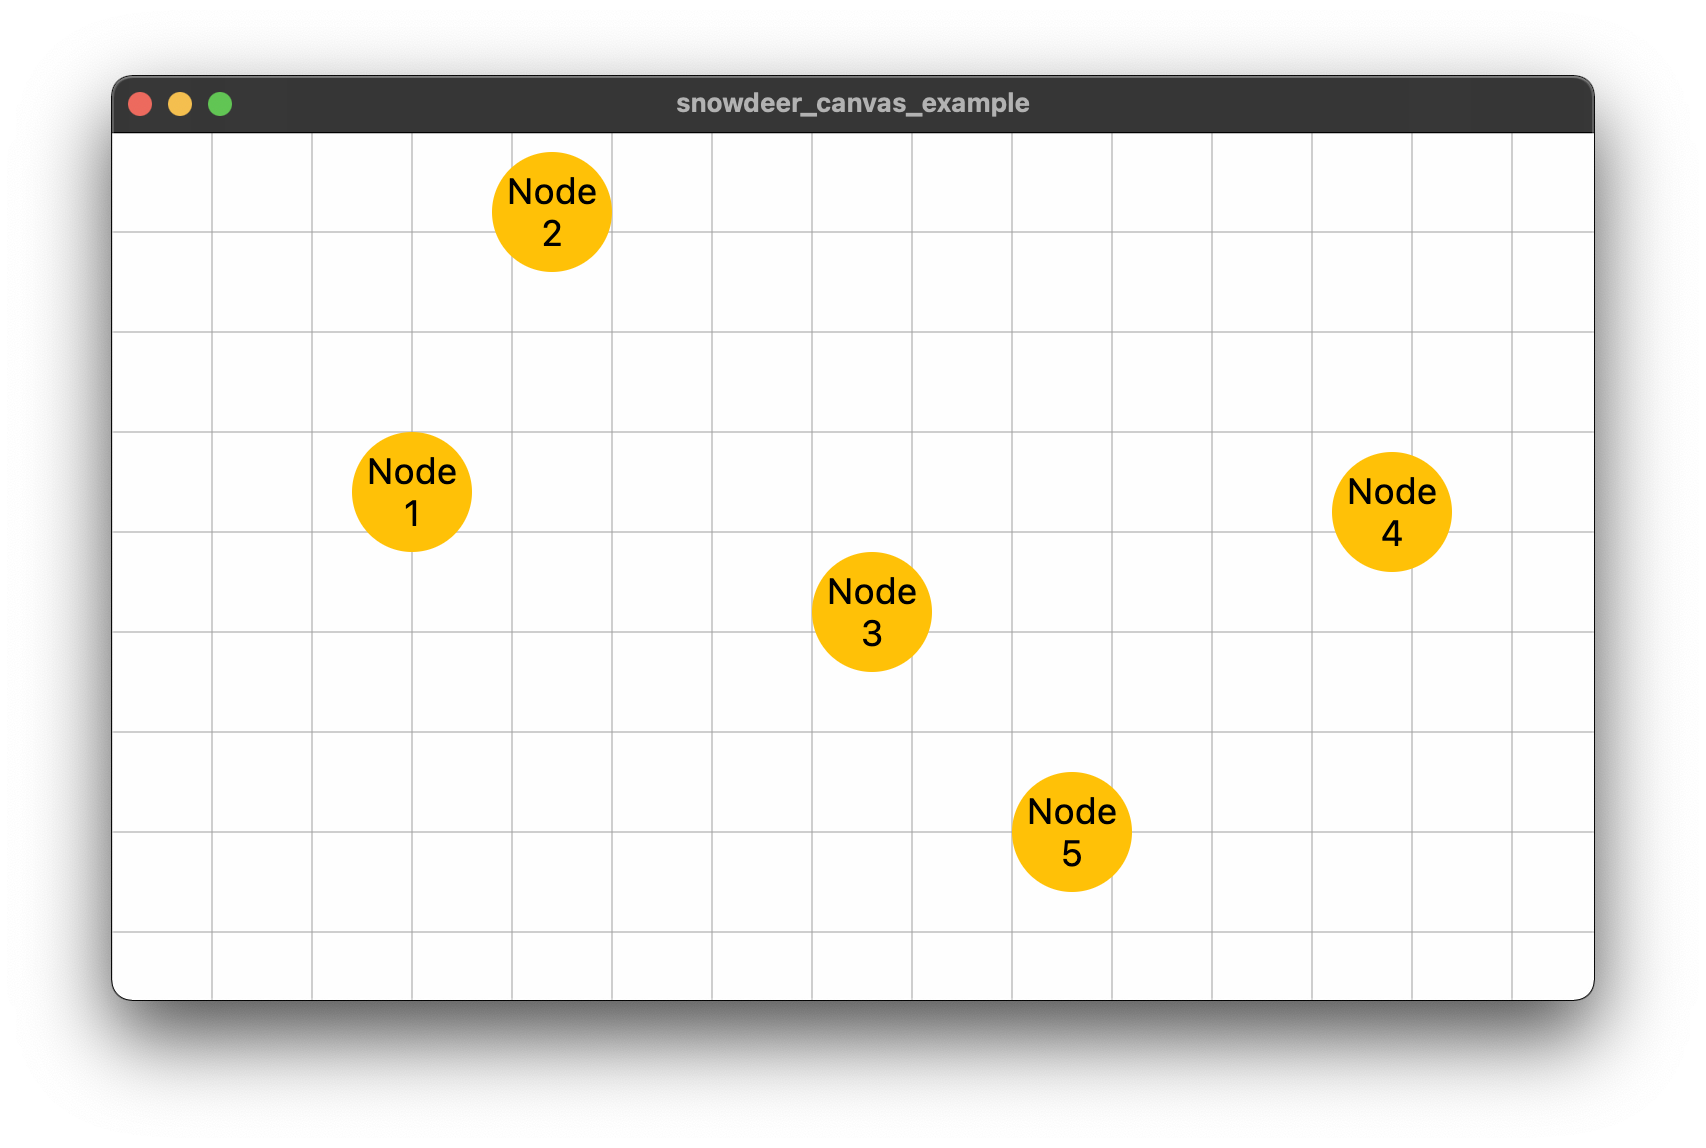
void initNodes() {
nodeList.clear();
nodeList.add(Node(1, "Node\n1", 150.0, 210.0));
nodeList.add(Node(2, "Node\n2", 220.0, 40.0));
nodeList.add(Node(3, "Node\n3", 440.0, 240.0));
nodeList.add(Node(4, "Node\n4", 640.0, 150.0));
nodeList.add(Node(5, "Node\n5", 480.0, 350.0));
}
void initEdges() {
edgeList.clear();
edgeList.add(Edge(1, 2));
edgeList.add(Edge(3, 2));
edgeList.add(Edge(5, 3));
edgeList.add(Edge(5, 4));
}
Node getNode(x, y) {
const radius = 30.0;
for (final node in nodeList) {
final c = Offset(node.x - x + offsetX, node.y - y + offsetY);
if (c.distance <= radius) {
return node;
}
}
return null;
}
void _handlePanDown(details) {
final x = details.localPosition.dx;
final y = details.localPosition.dy;
final node = getNode(x, y);
if (node != null) {
currentNode = node;
} else {
currentNode = null;
}
preX = x;
preY = y;
}
void _handlePanUpdate(details) {
final dx = details.localPosition.dx - preX;
final dy = details.localPosition.dy - preY;
if (currentNode != null) {
setState(() {
currentNode.x = currentNode.x + dx;
currentNode.y = currentNode.y + dy;
});
} else {
setState(() {
offsetX = offsetX + dx;
offsetY = offsetY + dy;
});
}
preX = details.localPosition.dx;
preY = details.localPosition.dy;
}
void _handleLongPressDown(details) {}
void _handleLongPressMoveUpdate(details) {}
@override
Widget build(BuildContext context) {
return Scaffold(
body: GestureDetector(
onPanDown: _handlePanDown,
onPanUpdate: _handlePanUpdate,
onLongPressDown: _handleLongPressDown,
onLongPressMoveUpdate: _handleLongPressMoveUpdate,
child: CustomPaint(
child: Container(),
painter: DraggablePainter(nodeList, edgeList, offsetX, offsetY),
),
),
);
}
}