git 컨닝 페이퍼

|

기본 명령어

명령어 | 설명 — | — git init | 현재 위치를 git 저장소로 초기화 git add [파일] | 해당 파일을 git에 등록하거나 수정된 파일을 추가 git commit | 변경된 내용을 커밋 git status | 현재 상태를 출력

응용

  • git add . : 모든 파일을 git에 추가함 git commit –amend | 같은 브랜치 상의 최종 커밋을 취소하고 새로운 내용을 추가한 커밋을 할 수 있음

브랜치 관련 명령어

명령어 | 설명 — | — git branch [이름] | 해당 이름의 브랜치를 생성 git checkout [브랜치이름] | 해당 이름의 브랜치로 변경 git merge [브랜치이름] | 현재 브랜치에 [브랜치이름]의 브랜치 내용을 정합

응용

  • git branch -D [이름] 해당 이름의 브랜치를 삭제
  • git checkout -B [브랜치이름] 해당 이름의 브랜치를 생성하면서 변경

원격 명령어

명령어 | 설명 — | — git clone | 원격 저장소의 모든 내용을 로컬에 저장 git remote | 로컬 저장소를 원격 저장소에 연결 git push | 로컬 저장소의 내용을 원격 저장소에 전달 git fetch | 로컬 저장소와 원격 저장소의 변경 사항이 다를 때 이를 대조하고 최신 데이터를 반영함 git pull | 원격 저장소의 최신 내용을 로컬 저장소에 업데이트

고급 명령어

명령어 | 설명 — | — git tag | 커밋을 참조하기 쉽도록 태그를 붙임 git revert | 이전에 작성한 커밋을 지우지만 지운 내역을 남김 git reset | 커밋을 버리고 이전의 특정 버전으로 되돌아감. git revert와의 차이는 지운 커밋 내역을 남기지 않는다는 점 git rebase | 브랜치 이력을 확인하면서 정합

응용

  • git checkout – [파일] 커밋하지 않은 변경 내역을 취소
  • git revase -i 커밋 내용을 합치면서 정합

Pixi.js 기본 도형 그린 후 회전하기

|

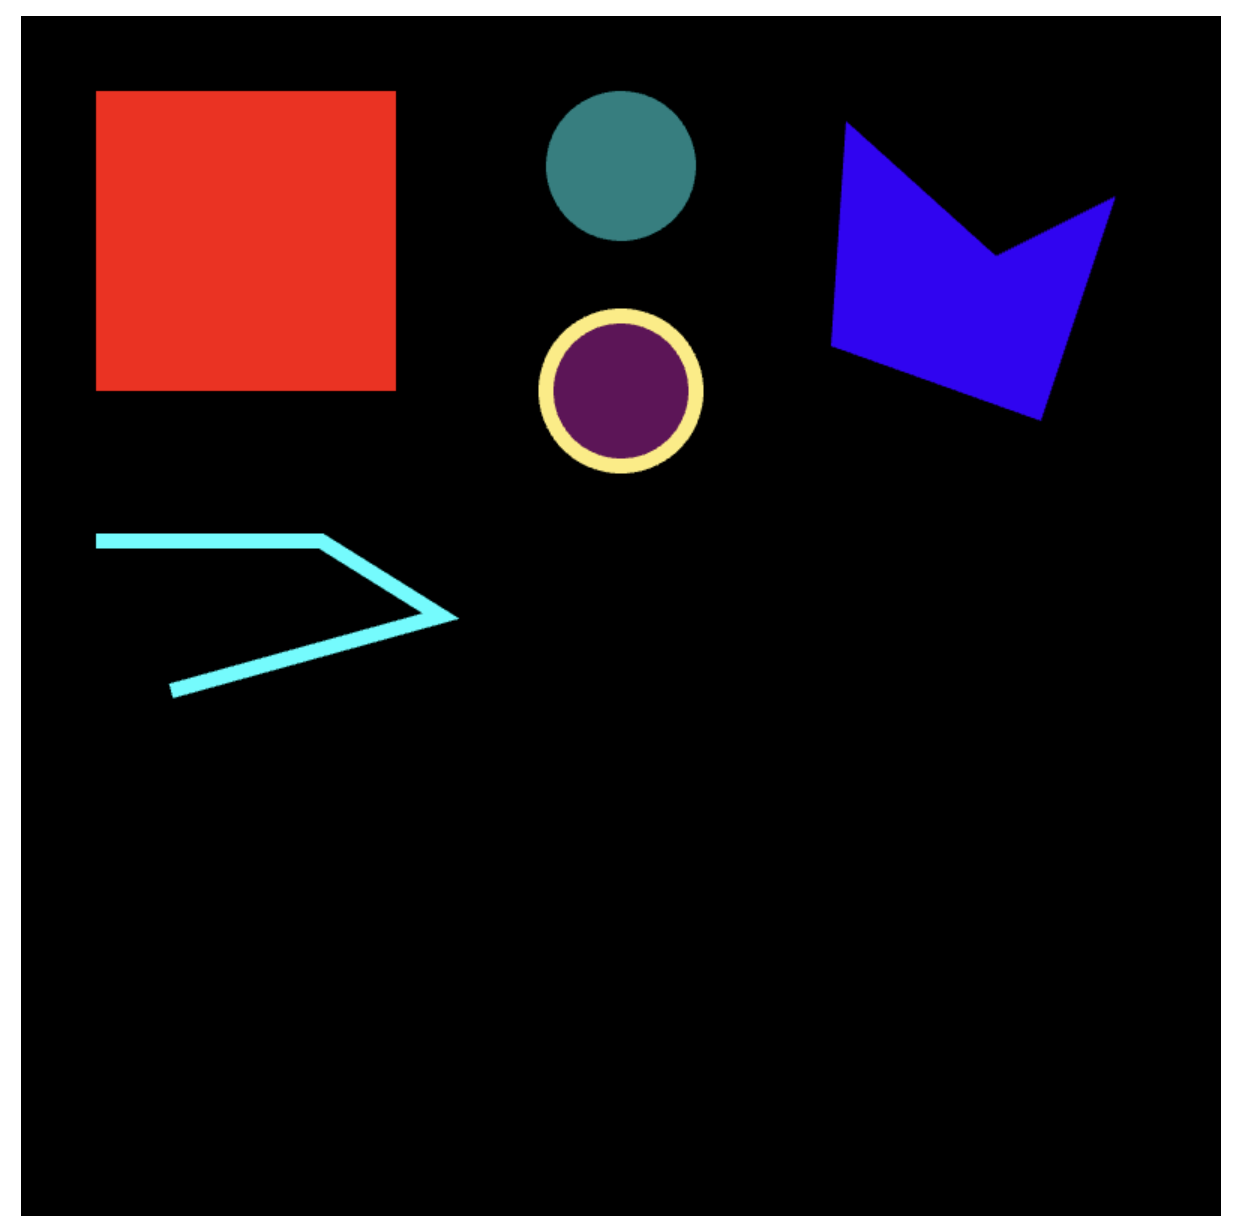
화면에 도형 그룹 그린 후 회전하는 코드

<template>
  <div id="container">
    <canvas id="pixi-canvas"></canvas>
  </div>
</template>

<script>
import * as PIXI from "pixi.js";
import { onMounted } from "@vue/runtime-core";

export default {
  setup() {
    onMounted(() => {
      const app = createPixiApp();

      const container = createContainerWithDrawingObjects();
      app.stage.addChild(container);

      container.pivot.x = container.width / 2;
      container.pivot.y = container.height / 2;
      container.x = container.width / 2;
      container.y = container.height / 2;

      let elapsed = 0.0;
      app.ticker.add((delta) => {
        elapsed += delta;

        if (elapsed < 1) return;
        elapsed = 0;

        container.rotation = container.rotation + 0.01;
      });
    });

    const createPixiApp = () => {
      var canvas = document.getElementById("pixi-canvas");

      const app = new PIXI.Application({
        width: 800,
        height: 800,
        antialias: true,
        backgroundAlpha: true,
        view: canvas,
      });

      return app;
    };

    const createContainerWithDrawingObjects = () => {
      const container = new PIXI.Container();

      const rect = new PIXI.Graphics();
      rect.beginFill(0xff0000);
      rect.drawRect(50, 50, 200, 200);
      rect.endFill();
      container.addChild(rect);

      const c1 = new PIXI.Graphics();
      c1.lineStyle(0);
      c1.beginFill(0x008080);
      c1.drawCircle(400, 100, 50);
      c1.endFill();
      container.addChild(c1);

      const c2 = new PIXI.Graphics();
      c2.lineStyle(10, 0xfeeb77, 1);
      c2.beginFill(0x650a5a, 1);
      c2.drawCircle(400, 250, 50);
      c2.endFill();
      container.addChild(c2);

      const polyline = new PIXI.Graphics();
      polyline.lineStyle(10, 0x00ffff);
      polyline.moveTo(50, 350);
      polyline.lineTo(200, 350);
      polyline.lineTo(280, 400);
      polyline.lineTo(100, 450);
      container.addChild(polyline);

      const polygon = new PIXI.Graphics();
      polygon.lineStyle(0);
      polygon.beginFill(0x3500fa, 1);
      polygon.moveTo(550, 70);
      polygon.lineTo(650, 160);
      polygon.lineTo(730, 120);
      polygon.lineTo(680, 270);
      polygon.lineTo(540, 220);
      polygon.closePath();
      polygon.endFill();
      container.addChild(polygon);

      return container;
    };
  },
};
</script>

<style>
#container {
  display: block;
  background: white;
  padding: 20px;
}

#pixi-canvas {
  width: 600px;
  height: 600px;
}
</style>

Container를 회전하는 코드

여기서 중요한 부분은 아래 코드 부분입니다. container.pivot는 회전할 때의 중심 좌표를 의미합니다. 기본값은 0 이며, 이 경우 회전할 때 Container의 왼쪽상단 부분의 꼭지점을 기준으로 회전합니다.

그리고 pivot를 Container의 중심으로 정하면, 화면에 좌표를 기준도 Container의 중심으로 변경됩니다. 따라서 기존과 같은 좌표에 도형을 그리기 위해서는 Container의 (x, y) 좌표를 변경할 필요가 있습니다.

container.pivot.x = container.width / 2;
container.pivot.y = container.height / 2;
container.x = container.width / 2;
container.y = container.height / 2;

let elapsed = 0.0;
app.ticker.add((delta) => {
  elapsed += delta;

  if (elapsed < 1) return;
  elapsed = 0;

  container.rotation = container.rotation + 0.01;
});

위에서

container.pivot.x = container.width / 2;
container.pivot.y = container.height / 2;
container.x = container.width / 2;
container.y = container.height / 2;

코드는

container.pivot.set(container.width / 2, container.height / 2);
container.position.set(container.width / 2, container.height / 2);

로도 작성 가능합니다.

Pixi.js 기본 도형 그리기

|

화면에 피카츄 그리기

<template>
  <div id="container">
    <canvas id="pixi-canvas"></canvas>
  </div>
</template>

<script>
import * as PIXI from "pixi.js";
import { onMounted } from "@vue/runtime-core";

export default {
  setup() {
    onMounted(() => {
      const app = createPixiApp();

      createDrawingObjects(app);
    });

    const createPixiApp = () => {
      var canvas = document.getElementById("pixi-canvas");

      const app = new PIXI.Application({
        width: 800,
        height: 800,
        antialias: true,
        backgroundAlpha: true,
        view: canvas,
      });

      return app;
    };

    const createDrawingObjects = (app) => {
      const rect = new PIXI.Graphics();
      rect.beginFill(0xff0000);
      rect.drawRect(50, 50, 200, 200);
      rect.endFill();
      app.stage.addChild(rect);

      const c1 = new PIXI.Graphics();
      c1.lineStyle(0);
      c1.beginFill(0x008080);
      c1.drawCircle(400, 100, 50);
      c1.endFill();
      app.stage.addChild(c1);

      const c2 = new PIXI.Graphics();
      c2.lineStyle(10, 0xfeeb77, 1);
      c2.beginFill(0x650a5a, 1);
      c2.drawCircle(400, 250, 50);
      c2.endFill();
      app.stage.addChild(c2);

      const polyline = new PIXI.Graphics();
      polyline.lineStyle(10, 0x00ffff);
      polyline.moveTo(50, 350);
      polyline.lineTo(200, 350);
      polyline.lineTo(280, 400);
      polyline.lineTo(100, 450);
      app.stage.addChild(polyline);

      const polygon = new PIXI.Graphics();
      polygon.lineStyle(0);
      polygon.beginFill(0x3500fa, 1);
      polygon.moveTo(550, 70);
      polygon.lineTo(650, 160);
      polygon.lineTo(730, 120);
      polygon.lineTo(680, 270);
      polygon.lineTo(540, 220);
      polygon.closePath();
      polygon.endFill();
      app.stage.addChild(polygon);
    };
  },
};
</script>

<style>
#container {
  display: block;
  background: white;
  padding: 20px;
}

#pixi-canvas {
  width: 600px;
  height: 600px;
}
</style>

실행 화면

image

Pixi.js 기본 흐름

|

Pixi.js의 기본 흐름

Pixi.js에 대한 더 자세한 내용은 여기에서 확인할 수 있습니다.

기본 흐름

Pixi.js의 기본 흐름은 다음과 같습니다.

  1. HTML 작성
  2. Pixi Application 생성
  3. HTML에 Pixi Application 연동
  4. stage에 오브젝트 추가
  5. Update Looping

Pixi Application 생성 및 HTML 연동

Pixi Application을 생성해서 HTML에 연동하는 예제 코드는 이전 포스팅에서 언급했기 때문에 여기서는 stage에 오브젝트 추가Update Looping에 대한 예제만 다룹니다.

stage에 오브젝트 추가

stage에 오브젝트 추가는 화면에 오브젝트를 렌더링하는 단계가 아닙니다. 단순히 stage라는 컨테이너(Container)에 오브젝트를 추가할 뿐이며, 추가된 오브젝트는 별도의 렌더링 과정에서 그리게 됩니다.

다음과 같은 코드를 이용해서 stage에 오브젝트를 추가할 수 있습니다.

const sprite = PIXI.Sprite.from('pikachu.png');
 app.stage.addChild(sprite);

Update Loop

다음과 같은 코드를 통해 매 Frame 마다 화면을 갱신할 수 있습니다. delta에는 Tick마다 흘러간 시간이 매개변수로 전달됩니다. 따라서 delta 값을 이용해서 흘러간 시간을 체크할 수 있고, Frame rate도 조절할 수 있습니다.

// Add a variable to count up the seconds our demo has been running
let elapsed = 0.0;
// Tell our application's ticker to run a new callback every frame, passing
// in the amount of time that has passed since the last tick
app.ticker.add((delta) => {
  // Add the time to our total elapsed time
  elapsed += delta;
  // Update the sprite's X position based on the cosine of our elapsed time.  We divide
  // by 50 to slow the animation down a bit...
  sprite.x = 100.0 + Math.cos(elapsed/50.0) * 100.0;
});

다만 Ticker는 특정 시간 후 호출되는 Callback 함수이며, 별도로 Ticker를 지정하지 않더라도 stage에 오브젝트만 추가한다면 정적인 화면을 렌더링할 수 있습니다.

Vue.js 3.0 Responsible Navigation Drawer 예제

|

화면 크기에 따라 동작이 바뀌는 Navigation Drawer

화면의 너비(width)에 따라 슬라이딩 및 오버레이 동작으로 작동하는 Navigation Drawer 입니다. 브라우저의 폭이 넓으면 슬라이딩(Sliding, Push) 방식으로 동작하며, 폭이 좁은 경우에는 오버레이(Overlay, OffCanvas)로 동작합니다.

BootStrap과 scss를 사용하지만, 실제 동작은 순수 Vue와 css로 동작합니다. Vue 3.0의 Composition API를 활용해서 구현되었으며, 화면 크기는 Media Query를 이용해서 확인합니다.

필요 패키지 설치

npm i bootstrap --save
npm i bootstrap-icons --save
npm i sass --save
npm i sass-loader --save

소스 코드들

main.js

import { createApp } from "vue";
import App from "./App.vue";
import bootstrap from "bootstrap";
import "bootstrap-icons/font/bootstrap-icons.css";

createApp(App).use(bootstrap).mount("#app");

App.vue

<template>
  <div id="app">
    <NavigationDrawer
      id="drawer"
      :class="isDrawerOpened ? 'opened' : 'closed'"
      @menu-selected="drawerMenuSelected"
    />
    <div
      id="drawer-dismiss-panel"
      v-if="isDrawerOpened"
      @click="closeDrawer"
    ></div>
    <div id="main" :class="{ 'drawer-opened': isDrawerOpened }">
      <AppBar id="appbar" @toggle-drawer="onToggleDrawer" />

      <div id="content">This is a navigation drawer sample.</div>
    </div>
  </div>
</template>

<script setup>
import NavigationDrawer from "@/components/NavigationDrawer.vue";
import AppBar from "@/components/AppBar.vue";
import { ref } from "@vue/reactivity";

const isDrawerOpened = ref(false);

const onToggleDrawer = () => {
  isDrawerOpened.value = !isDrawerOpened.value;
};

const closeDrawer = () => {
  isDrawerOpened.value = false;
};

const drawerMenuSelected = (menu) => {
  console.log(`Menu(${menu}) is selected !!`);
};
</script>

<style lang="scss" scoped>
$primary: #009688;
$secondary: #4db6ac;
$dark: #004d40;
$accent: #64ffda;
$translucent: rgba(0, 0, 0, 0.7);

#app {
  font-family: Avenir, Helvetica, Arial, sans-serif;
  -webkit-font-smoothing: antialiased;
  -moz-osx-font-smoothing: grayscale;

  display: flex;
  flex-direction: row;
  background: black;
  color: white;

  width: 100vw;
  height: 100vh;
}

#drawer {
  position: absolute;
  z-index: 10;
  width: 180px;
  margin-left: -180px;
  height: 100vh;
  overflow: hidden;
  transition: 0.3s;
}
#drawer.opened {
  margin-left: 0px;
}
#drawer.closed {
  margin-left: -180px;
}
#drawer-dismiss-panel {
  display: none;
}

#main {
  position: absolute;
  z-index: 1;
  width: 100vw;
  height: 100vh;
  transition: 0.3s;
}
#main.drawer-opened {
  margin-left: 180px;
  width: calc(100% - 180px);
}
#main.drawer-closed {
  margin-left: 0px;
  width: 100%;
}

#appbar {
  margin: 0;
  background: $primary;
}

#content {
  margin: 0;
  color: black;
  background-color: whitesmoke;
  width: 100%;
  height: 100%;
}

@media screen and (max-width: 480px) {
  #drawer {
    position: fixed;
  }
  #drawer-dismiss-panel {
    display: inline-block;
    position: fix;
    z-index: 5;
    width: 100vw;
    height: 100vh;
    background-color: $translucent;
  }
  #main {
    display: block;
    position: absolute;
  }
  #main.drawer-opened {
    margin-left: 0px;
    width: 100%;
  }
}
</style>

components/AppBar.vue

<template>
  <div id="appbar">
    <div
      id="hamburg-menu"
      class="align-horizontal-center align-vertical-center"
      @click="toggleDrawer"
    >
      <i class="bi bi-list"></i>
    </div>
    <div id="title" class="align-vertical-center">AppBar Title</div>
    <div id="action-items">
      <i class="action-item bi bi-heart"></i>
      <i class="action-item bi bi-three-dots-vertical"></i>
    </div>
  </div>
</template>

<script setup>
import { defineEmits } from "vue";

const emit = defineEmits(["toggle-drawer"]);
const toggleDrawer = () => {
  emit("toggle-drawer");
};
</script>

<style lang="scss" scoped>
$accent: #64ffda;

.align-horizontal-center {
  display: flex;
  flex-direction: row;
  justify-content: center;
}

.align-vertical-center {
  display: flex;
  flex-direction: row;
  align-items: center;
}

#appbar {
  display: flex;
  flex-direction: row;
  height: 48px;
}

#hamburg-menu {
  width: 48px;
  height: 48px;
}
#hamburg-menu:hover {
  color: black;
  background: $accent;
}

#title {
  flex: 1;
  height: 48px;
}

#action-items {
  display: flex;
  flex-direction: row;
  height: 48px;
}

.action-item {
  width: 48px;
  height: 48px;
  display: flex;
  justify-content: center;
  align-items: center;
}
.action-item:hover {
  color: black;
  background: $accent;
}
</style>

components/NavigationDrawer.vue

<template>
  <div id="drawer">
    <div id="header">SnowDeer Drawer</div>
    <div id="content">
      <div class="menu-item">
        <i class="bi bi-house"></i>
        <span>Home</span>
      </div>
      <div class="menu-item">
        <i class="bi bi-gift"></i>
        <span>Hello</span>
      </div>
      <div class="menu-item">
        <i class="bi bi-info-square"></i>
        <span>About</span>
      </div>
    </div>
  </div>
</template>

<style lang="scss" scoped>
$primary: #009688;
$secondary: #4db6ac;
$dark: #004d40;
$accent: #64ffda;
$translucent: rgba(0, 0, 0, 0.7);

#header {
  padding-top: 20px;
  padding-left: 12px;
  height: 64px;
  font-size: large;
  font-weight: bold;
  color: $accent;
  background: $dark;
  white-space: nowrap;
}

#content {
  background: $secondary;
  height: 100vh;
}

.menu-item {
  padding: 16px;
  cursor: pointer;
}

.menu-item:hover {
  color: black;
  background: turquoise;
}
</style>