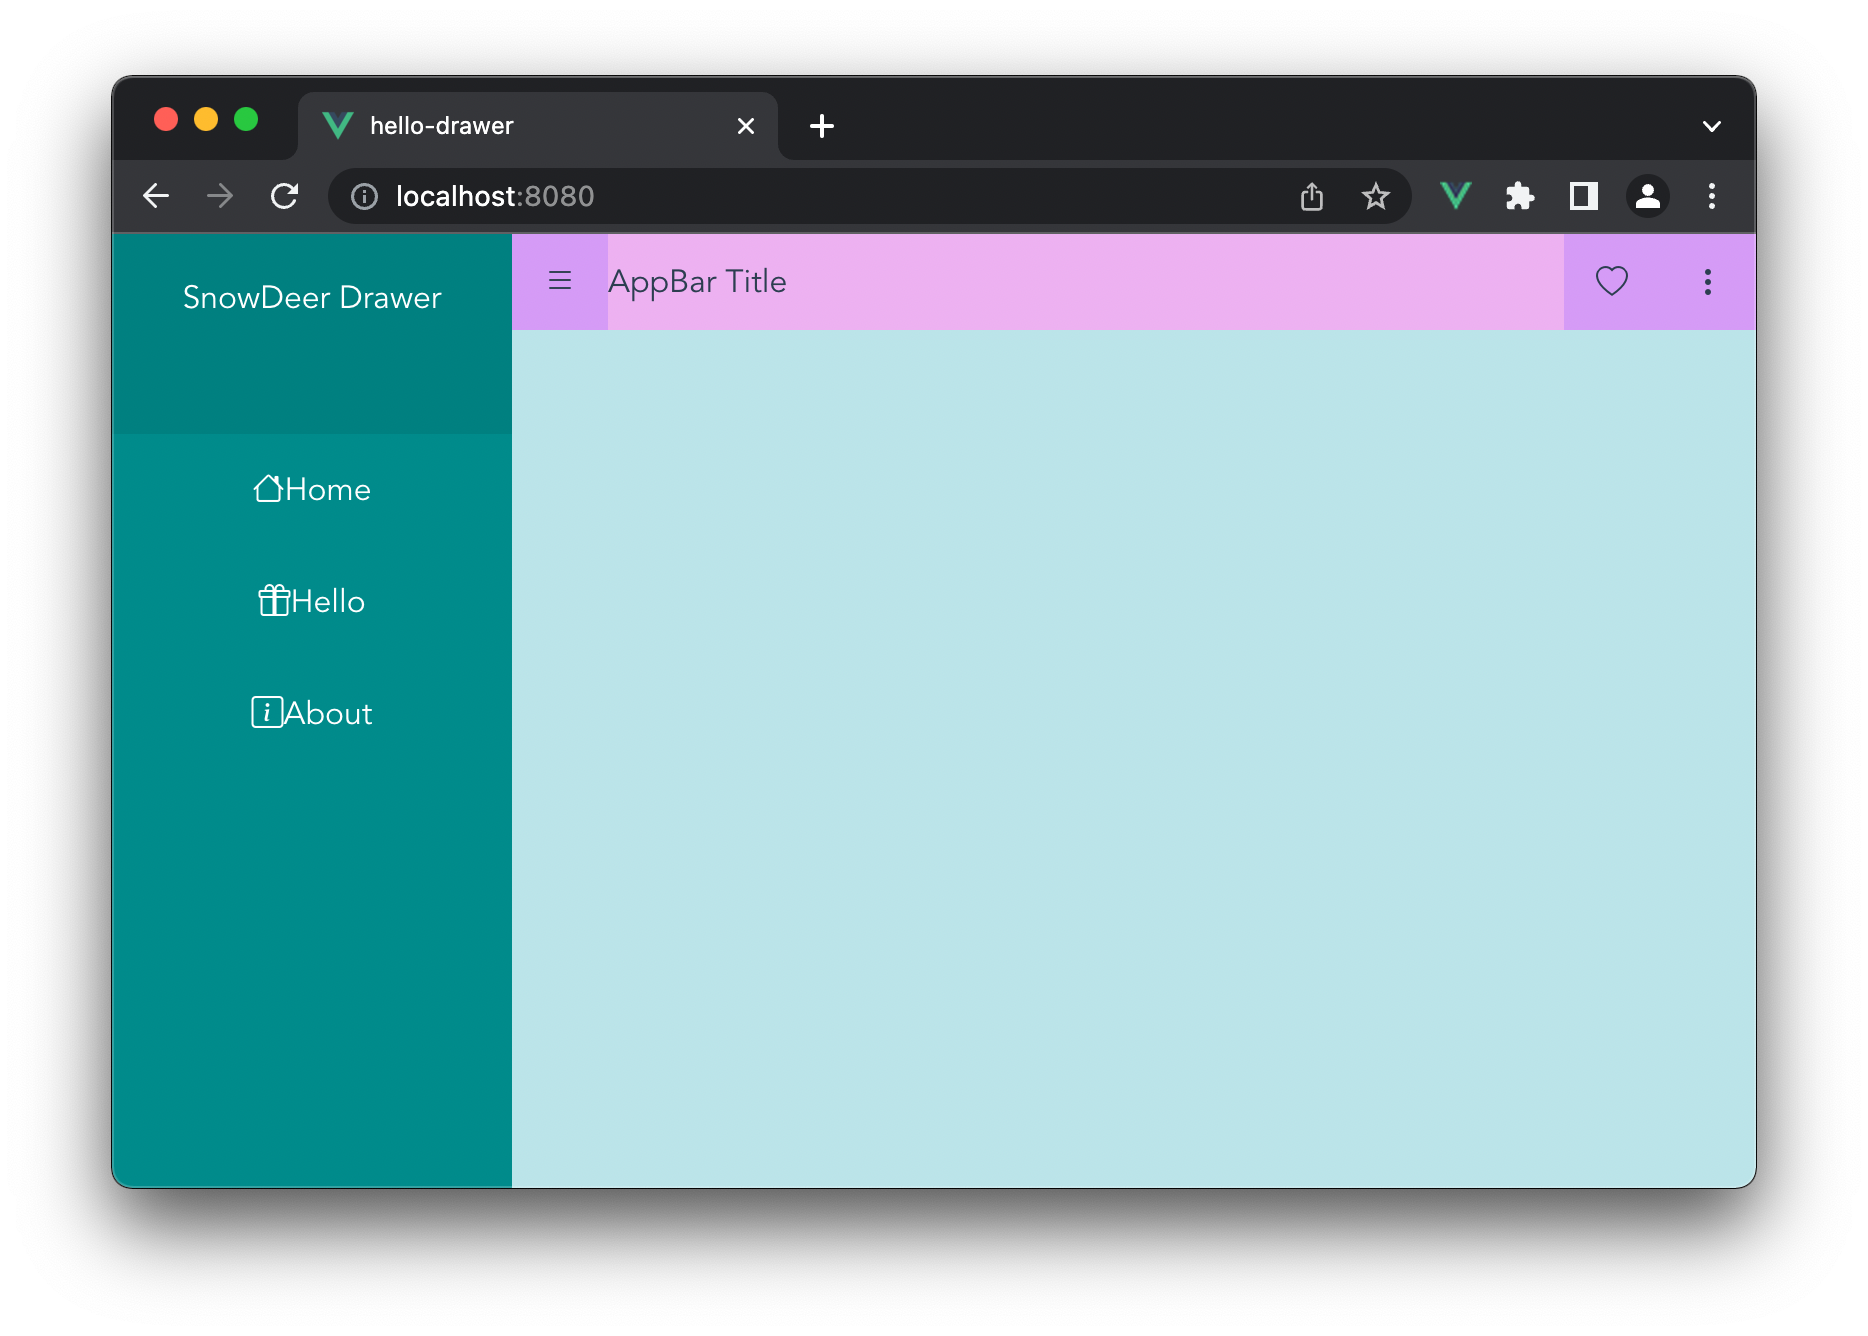
Vuetify 기본 레이아웃(전체 레이아웃)

|

Vuetify 전체 레이아웃

기본적으로 Material Design의 레이아웃입니다.

image

  • v-app-bar
  • v-bottom-navigation
  • v-footer
  • v-navigation-drawer
  • v-system-bar
  • v-content
<template>
  <v-app ref="app">
    <v-navigation-drawer> </v-navigation-drawer>

    <v-app-bar> </v-app-bar>

    <v-main>
      <v-container fluid>
        <router-view></router-view>
      </v-container>
    </v-main>

    <v-footer> </v-footer>
  </v-app>
</template>

간단한 내용을 채운 예제

<template>
  <v-app>
    <v-navigation-drawer> </v-navigation-drawer>

    <v-app-bar color="primary">
      <v-app-bar-nav-icon></v-app-bar-nav-icon>
      <v-toolbar-title>SnowDeer's Basic Layout</v-toolbar-title>
    </v-app-bar>

    <v-main class="pb-16">
      <v-container fluid>
        <h2>What is Lorem Ipsum?</h2>
        <div>
          Lorem Ipsum is simply dummy text of the printing and typesetting
          industry. Lorem Ipsum has been the industry's standard dummy text ever
          since the 1500s, when an unknown printer took a galley of type and
          scrambled it to make a type specimen book. It has survived not only
          five centuries, but also the leap into electronic typesetting,
          remaining essentially unchanged. It was popularised in the 1960s with
          the release of Letraset sheets containing Lorem Ipsum passages, and
          more recently with desktop publishing software like Aldus PageMaker
          including versions of Lorem Ipsum.
        </div>
        <br />
        <h2>Where does it come from?</h2>
        <div>
          Contrary to popular belief, Lorem Ipsum is not simply random text. It
          has roots in a piece of classical Latin literature from 45 BC, making
          it over 2000 years old. Richard McClintock, a Latin professor at
          Hampden-Sydney College in Virginia, looked up one of the more obscure
          Latin words, consectetur, from a Lorem Ipsum passage, and going
          through the cites of the word in classical literature, discovered the
          undoubtable source. Lorem Ipsum comes from sections 1.10.32 and
          1.10.33 of "de Finibus Bonorum et Malorum" (The Extremes of Good and
          Evil) by Cicero, written in 45 BC. This book is a treatise on the
          theory of ethics, very popular during the Renaissance. The first line
          of Lorem Ipsum, "Lorem ipsum dolor sit amet..", comes from a line in
          section 1.10.32.
        </div>
        <br />
        <div>
          The standard chunk of Lorem Ipsum used since the 1500s is reproduced
          below for those interested. Sections 1.10.32 and 1.10.33 from "de
          Finibus Bonorum et Malorum" by Cicero are also reproduced in their
          exact original form, accompanied by English versions from the 1914
          translation by H. Rackham.
        </div>
        <br />
        <h2>Why do we use it?</h2>
        <div>
          It is a long established fact that a reader will be distracted by the
          readable content of a page when looking at its layout. The point of
          using Lorem Ipsum is that it has a more-or-less normal distribution of
          letters, as opposed to using 'Content here, content here', making it
          look like readable English. Many desktop publishing packages and web
          page editors now use Lorem Ipsum as their default model text, and a
          search for 'lorem ipsum' will uncover many web sites still in their
          infancy. Various versions have evolved over the years, sometimes by
          accident, sometimes on purpose (injected humour and the like).
        </div>
      </v-container>
    </v-main>
    <v-footer color="secondary" bottom fixed padless style="width: 100%">
      <div class="mx-auto">Copyright ©</div>
    </v-footer>
  </v-app>
</template>

참고 사이트

  • https://next.vuetifyjs.com/en/components/application/

Vue.js 3에서 Vuetify 사용하기

|

Vuetify

현재 Vuetify는 Vue 3를 지원하지 않습니다. 공식 페이지에서는 다음과 같이 2022년 5월 Vue 3를 지원하는 3.0이 릴리즈된다고 합니다.

The current version of Vuetify does not support Vue 3. Support for Vue 3 will come with the release of Vuetify v3. When creating a new project, please ensure you selected Vue 2 from the Vue CLI prompts, or that you are installing to an existing Vue 2 project.

따라서 현재는 Vue 3에서는 Vuetify 3 beta 버전을 이용해야 합니다. 물론 테스트 목적으로만 사용하고 공식적인 프로그램에서는 사용하지 말라고 경고하고 있습니다.

Vuetify 3 beta 버전 페이지는 여기입니다.


설치 방법

Vuetify를 설치하기 위해서는 아래 명령어를 이용합니다.

vue add vuetify

설치되고 나며, 자동으로 package.jsonmain.jsVuetify 관련 코드가 삽입됩니다.

main.js

import { createApp } from 'vue'
import App from './App.vue'
import vuetify from './plugins/vuetify'
import { loadFonts } from './plugins/webfontloader'

loadFonts()

createApp(App)
  .use(vuetify)
  .mount('#app')

확인

확인을 위해 여기에서 간단한 예제를 App.vue에 삽입해보고 Vuetify가 잘 동작하는지 확인해봅니다.

App.vue

<template>
  <v-app ref="app">
    <v-app-bar color="grey-lighten-2" name="app-bar" class="justify-center">
      <div class="d-flex justify-center align-center w-100">
        <v-btn @click="print('app-bar')">Get data</v-btn>
      </div>
    </v-app-bar>
    <v-navigation-drawer color="grey-darken-2" permanent name="drawer">
      <div class="d-flex justify-center align-center h-100">
        <v-btn @click="print('drawer')">Get data</v-btn>
      </div>
    </v-navigation-drawer>
    <v-main>
      <v-card height="200px"></v-card>
    </v-main>
  </v-app>
</template>

<script>
export default {
  name: "App",
  data: () => ({
    layout: null,
  }),
  methods: {
    print(key) {
      alert(JSON.stringify(this.$refs.app.getLayoutItem(key), null, 2));
    },
  },
};
</script>

실행화면

image

모던 자바스크립트 ES6+ 기본 내용

|

모던 자바스크립트 기본 내용

자바스크립트가 ES6+로 변경되면서 추가, 변경된 점들입니다.


블럭함수

선언식

선언식은 기존에 자바스크립트에서 사용하던 방식입니다.

function hello() {
    alert("Hello");
}

표현식

표현식은 함수를 변수에 할당하는 방식이며, 함수의 이름이 없습니다.

const add = function (a, b) {
    return a + b;
}

호이스팅

호이스팅(Hoisting)은 자바스크립트의 기능 중 하나로 코드 실행 전에 내부의 변수와 함수 선언부를 맨 위로 옮겨주는 기능입니다. 다만, 함수 정의 방법인 ‘선언식’과 ‘표현식’ 중 ‘선언식’에만 작동합니다.

즉, 아래와 같은 코드에서

hello();
function hello() {
    alert("Hello");
}

const c = add(3, 5);
const add = function (a, b) {
    return a + b;
}

아래 쪽의 표현식으로 정의된 코드는 add is not defined 오류가 발생합니다. 즉, 순서를 생각해서 구현해야 합니다.

화살표 함수

화살표 함수는 ES6에서 새로 추가된 함수 정의 방식입니다.

자바스크립트가 ES6으로 넘어오면서 가장 효과적으로 바뀐 문법이며, 모던 자바스크립트 프로그래밍에서 가장 많이 사용되는 방식입니다.

아래와 같은 형태로 표현할 수 있습니다.

const hello = () => {
    alert("Hello");
}

const add = (a, b) => {
    return a + b;
}

변수 선언 var, let, const

var

var는 ES6 이전부터 지원하던 키워드이며, let, const는 ES6 이후에 추가된 키워드입니다.

var 키워드의 가장 큰 특징은 함수 스코프(Function Scope) 지원입니다. 중괄호로 표현되는 블럭 스코프(Block Scope)를 지원하지 않으며, 블럭 내부에서 블럭 외부의 변수 값을 변경하면 그대로 변경되는 특징이 있습니다. 또한 같은 이름으로 중복 선언해도 오류가 발생하지 않기 때문에 프로그램이 커질 경우 블럭 내부에서 선언된 변수가 블럭 외부의 중요한 변수 값을 변경시킬 수 있는 위험이 있습니다.

let, const

letconst는 블럭 스코프를 지원합니다. 동일 스코프내에서 같은 이름의 변수를 선언할 수 없는 특징이 있습니다. 다만 블럭 스코프 외부의 전역에서는 사용할 수 없습니다.

  • let : 변수 값을 계속 변경 가능
  • const : 변수 값을 한 번 할당하면 바꿀 수 없음

letconst를 사용하면 var은 더 이상 사용할 필요가 없으며, ES6+ 버전부터는 var를 사용하지 않습니다. 단, 전역 변수가 필요한 경우에 예외적으로 var를 사용할 수 있습니다.


모듈 export, import

모듈(Module)은 코드를 관리하는 가장 작은 단위입니다. 프로젝트내 많은 코드에서 공통적으로 호출해서 사용할 수 있었지만, 변수 이름이나 함수 이름 충돌이 자주 발생할 수 있는 문제가 있었고, ES6부터 모듈의 export, import 기능이 생겨 이 문제가 개선되었습니다.

module export

모듈 Export는 이름으로 내보내는 방식과 default로 내보내는 방식 2가지가 있습니다.

이름으로 내보내기

const message = "Hello";

const add = (a, b) => {
    return a + b;
}

export { message, add };

이름으로 가져오기

import { message, add } from './snow_library.js";

import * as snowLibrary from './snow_library.js";

default로 내보내기

const add = (a, b) => {
    return a + b;
}

export default add;

기본으로 내보내는 경우 모듈당 하나의 함수나 클래스만 공유할 수 있습니다.

default로 가져오기

default로 선언된 모듈을 가져올 때는 다음과 같이 이름을 변경할 수 있습니다.

import myAdd snowLibrary from './snow_library.js";

JSON

JSON.stringfy()

자바스크립트 객체를 텍스트로 변환합니다.

JSON.parse()

텍스트를 자바스크립트 객체로 변환합니다.


Promise

Promise는 ES6부터 추가된 기능으로 기존 자바스크립트에서 비동기 처리를 위해서는 콜백(Callback) 함수를 이용했습니다. 콜백 함수로 대부분의 기능을 구현할 수 있었으나 다음과 같은 한계가 있었습니다.

  • 콜백 지옥 문제 : 콜백의 중첩으로 코드 관리가 힘들어지는 경우가 발생
  • 반환값 처리 문제 : 콜백 실행 시점과 종료 시점이 분리되어 반환값을 관리하기가 어려워짐

ES6에 추가된 Promise는 비동기 처리 방식으로 실행된 결과의 성공과 실패를 담는 객체입니다. 예제는 다음과 같습니다.

<html>
  <body>
    <h1>Hello, Promise !!</h1>
    <button onclick="testPromise()">Click</button>
    <script>
      const func = () => {
        const resp = Math.random();
        console.log(`request() => ${resp}`);

        return resp > 0.5;
      };

      const testPromise = () => {
        console.log(`testPromise() is called.`);

        const request = new Promise((onSuccess, onFailed) => {
          const result = func();

          console.log(`result : ${result}`);

          if (result) {
            onSuccess();
          } else {
            onFailed();
          }
        });

        request.then(
          () => {
            console.log("Success !!");
          },
          () => {
            console.log("Failed !!!");
          }
        );
      };
    </script>
  </body>
</html>


await, async

Promise를 이용해서 비동기 처리를 훌륭하게 처리할 수 있었지만, 보다 유연하게 처리하기 위해서 awaitasync 키워드가 ES8에 추가되었습니다. Promise에 비해 코드가 간결해지고 가독성이 높아집니다.

await

await는 비동기로 이루어지는 함수의 결과를 대기하는 키워드입니다. 위에서 구현한 ‘request()’ 함수를 아래와 같이 대기할 수 있습니다.

const result = await request();
console.log(result);

하지만 await만 사용할 경우, 요청한 결과값이 나오지 않을 경우 무한 대기에 빠지는 문제가 있어서 비동기 처리 함수는 반드시 async를 붙여야 합니다.

async

일반 함수를 선언할 때 async를 붙여 비동기 방식으로 선언하는 키워드입니다.

git stash 사용하는 방법

|

git stash 사용법

현재 수정하고 있는 내용을 commit하지 않고 임시로 저장하는 방법입니다.

주요 명령어

다음의 두 명령어를 주로 사용합니다.

  • git stash : 변경 사항을 임시로 저장
  • git stash pop : 저장된 병경 사항을 꺼내서 현재 코드에 merge 함
  • git stash list : stash에 보관된 변경 사항 리스트를 출력

기본적으로 Stack으로 동작하며, pop 명령어로 변경 사항을 꺼내오면 그 내용은 stash에서 삭제합니다.

그 외에도 다음과 같은 명령이 있습니다.

git stash apply

stash에서 변경 사항을 꺼내오지만, 그 내용을 stash에서 삭제하지 않습니다.

git stash pop –index

기본적으로 git stash popstaged 상태는 복원이 되지 않습니다. 하지만, --index 옵션까지 붙이면 staged 상태까지 복원됩니다.

git stash branch

저장된 변경 사항으로 브랜치 새로 만다는 명령어입니다. stash에 저장된 내용을 pop 하기 때문에 저장된 내용은 stash에서 삭제 됩니다,

다음과 같이 실행합니다.

$ git stash branch new-branch-name

git checkout -f

stash 내용을 포함해서 HEAD의 모든 변경을 복원하는 경우 git checkout -f 명령어를 사용합니다.

git stash -u

git stash는 기본적으로 Git에서 관리하는 파일에 대해서만 임시 저장을 해주는데, git stash -u 명령어는 Git 저장소에 추가되지 않은 파일들에 대해서도 임시 저장을 해줍니다.

Vue.js 3 npm json-server 패키지

|

json-server 패키지

json-server는 json 파일을 이용해서 간단한 REST 서버를 만들어주는 npm 패키지입니다.

여기에서 설명을 볼 수 있습니다.

설치 방법

npm install -g json-server

Database 파일 작성

db.json 파일을 다음과 같이 작성합니다.

{
  "posts": [
    { "id": 1, "title": "json-server", "author": "typicode" }
  ],
  "comments": [
    { "id": 1, "body": "some comment", "postId": 1 }
  ],
  "profile": { "name": "typicode" }
}

실행 방법

json-server --watch db.json

\{^_^}/ hi!

  Loading db.json
  Done

  Resources
  http://localhost:3000/posts
  http://localhost:3000/comments
  http://localhost:3000/profile

  Home
  http://localhost:3000

  Type s + enter at any time to create a snapshot of the database
  Watching...

json 파일에 따라 REST API가 자동으로 만들어지며, json 파일을 수동으로 변경하더라도 자동으로 서버에 적용됩니다.